Showing posts with label Sakura Hobby Craft. Show all posts

Saturday, August 17, 2013

Crystal Lacquer Embellished Book Covers

Hi everyone!
Dale here, with my final DT project.  THANK YOU to Sakura Hobby Craft, Terri Sproul and the whole DT for a LOVELY experience.

As I have stated before, I enjoy shopping at thrift stores.  When I see old unloved books, I usually bring the real sad ones home.  I can use the pages for collage, or art journaling or make into paper fabric.
The book covers sometimes are falling off and that is where this week's project originated.

A set of book covers (sorry forgot to take photos right at the start) that I gessoed, then added all kinds of chipboard or textural embellishments with gel medium. I let them dry completely then gessoed the whole cover again.

This is where the FUN of 3D Crystal Lacquer and all the Terri Sproul Mixers comes in.

I put a blob of 3D Crystal lacquer onto my palette in 6 areas, then added the Mixers and mixed well. I, then, painted the areas on the book covers that I wanted with the bright colours.

Any leftover mixed 3D Crystal Lacquer/Mixer I painted on all the other areas, then used a baby wipe to rub off so it was a faded look.  Then, I cover the whole front and back covers with a layer of 3D Crystal Lacquer.

The coating of 3D Crystal lacquer made the covers more durable I think.
I added a hairband with a brad to the back cover, then used duct tape to make a centre binding (2 layers) before gluing thick scrapbook paper to the inside covers.

 I had a few sewn pages left from another journal, so I added plain copy paper (2 signatures) inside the 3 already sewn up pages and took them to the sewing machine. I set the stitch length longer than normal so it wouldn't tear the pages and slowly sewed thru all the layers.  Because of the duct tape, you will have to toss the needle after as the glue builds up on the needle.
To the front cover, I tied one of the bezel fobs to the hairband.


Now is a great time to try a project like this or one you like it, because you can get 20% off your entire purchase at Sakura Hobby Craft for the month ofAugust.  Just enter aug08 at checkout!

Wednesday, July 17, 2013

Heart Lifts spool

Hi everyone - Dale here!

This week, I would like to show you my little heartfelt reminders to myself....

This "Heart Lifts" has some of my touchstone words, & a couple quotes printed & glued inside to remind me on those days when life seems hard.

I started by choosing which glass tile shape I wanted. I found the right words in a unloved large print book, glued them to a circle cut to the right size from cardstock.  I added the red hearts with a gel pen. I used 3D Crystal Lacquer to adhere the cardstock to the bottom of the glass circle tile.  Set it aside to dry.
In my stash of wood pieces, I found the thread spool that would give me the room for the canvas once rolled up. I added lace trim to the bottom & top, covering the bottom with a piece of cardboard. Set aside to dry.

I had a scrap of heavy weight canvas leftover and cut it to a roughly 1 inch wide and had to sew the two pieces together to get the length of 11 inches.  I added the same lace trim on the edge of the canvas, once I had zigzagged the edges.
I glued my touch stone words - EMPOWER, STRENGTH, LOVE YOURSELF and a couple quotes to the inside of the canvas, leaving about 1.5 inches at the start so that could be glued to the wooden spool. I glued (I know I should have sewn it down, but was creating as I went along & didn't think of the ribbon until the canvas strip was already glued onto the spool) the vintage seam binding ribbon on the end. I added 3 sizes of paper flowers with a brad on the top end, covering the glued area of the ribbon.
I had FUN creating something different using the lovely glass tiles from Sakura Hobby Craft, hope you will attempt to make something similar for yourself, using touchstone "Heart Lifts" that mean something to YOU.

You can find all the jewelry findings, including glass tiles at Sakura Hobby 

AND
During the month of July, you will receive an additional 20% off your entire order simply by using code Summer07 at checkout!

Wednesday, July 3, 2013

Celebrate Box

Hi everyone - Dale here!
Hope your holiday week - CANADA DAY here in Canada and 4th of JULY in the USA are AWESOME for you!

I am always telling people to CELEBRATE their accomplishments, whether small or large. So, my first project for July is a little CELEBRATE box, where I can put a note in there for each achievement, goal, etc. through out the year.

I started with a little chocolate box that has been kicking around my stash of boxes for awhile.  The box measures 2.75 X 3.5 inches and is 1 inch deep.
I covered the lid with a scrapbook paper, and gessoed the print on the bottom of the box. The inside of the box was untouched.


The hardest decision - which one of Sakura Hobby Craft’s glass tiles and matching bezel cup.
The glass tiles are available in rectangle, square and circular shapes.
I decided to go with the bronze round one for this project.

I cut the word - "CELEBRATE" from a large print book, then added it to similar colour of paper, then used my only border punch to add similar paper as the box over & below the word.  I used 3D Crystal Lacquer to glue the glass tile over the word.
I tied the organza coloured ribbon through the bail at the top of the bezel cup.


I added a piece of vintage lace over a document seal sticker and a teal paper scrap, then used 3D Crystal Lacquer to glue down the bezel cup. Used it also to glue down the 5 beads around the bezel cup.
I added more vintage lace all around the side of the box top, then added the teal trim over the lace.

For each goal, or achievement that is reached, I will be adding a little note inside. At the end of the year, will record all those achievements in my journal and then start again in January 2014.

July is the perfect time to order all your Sakura Hobby Crafts products, because for the month of July, you can get 20% off your total purchase from Sakura by entering coupon code Summer07 at checkout!

Friday, May 17, 2013

Sequin Topairy

For my second milk tin project, I wanted to try a Topairy.
Topairy has been on my list of want to try for awhile.


I had used sequins in my other milk tin project, and since I had the sequin storage tote out, I decided to use more of my stash.  I selected these larger floral sequins and starting attaching them to a 3 inch styrofoam ball using 3D Crystal Lacquer (so if there was a space between them, it would be covered with the lacquer).


For the milk tin, I cut one of the styrofoam in half and formed it to find in the top part of the milk tin.  I covered the styrofoam with some dyed fibres I had received from a friend.
I, then, used double sided adhesive to add the rows of ribbons (vintage Stampin' Up) around the bottom of the milk tin.
Once the sequins were completely dry, I wrapped the stick part with fibres, and forced it into the styrofoam inside the milk tin.  I added the corrugated fence after it sat on my shelf for a couple days and I thought it needed more.  


During the month of May, you can get 20% off your total order at Sakura Hobby Craft.  Now is the perfect time to try Crystal Lacquer and Sakura’s other great products!  Just enter the code “Sakura05” at checkout.

Also, Sakura is hosting a blog hop on May 18th!  The theme is “Fantasy” and Sakura’s Design
Team is dreaming up amazing art to share with you on that day!  There will be prizes, too!  So be sure to check back here on May 18th!

Thursday, May 9, 2013

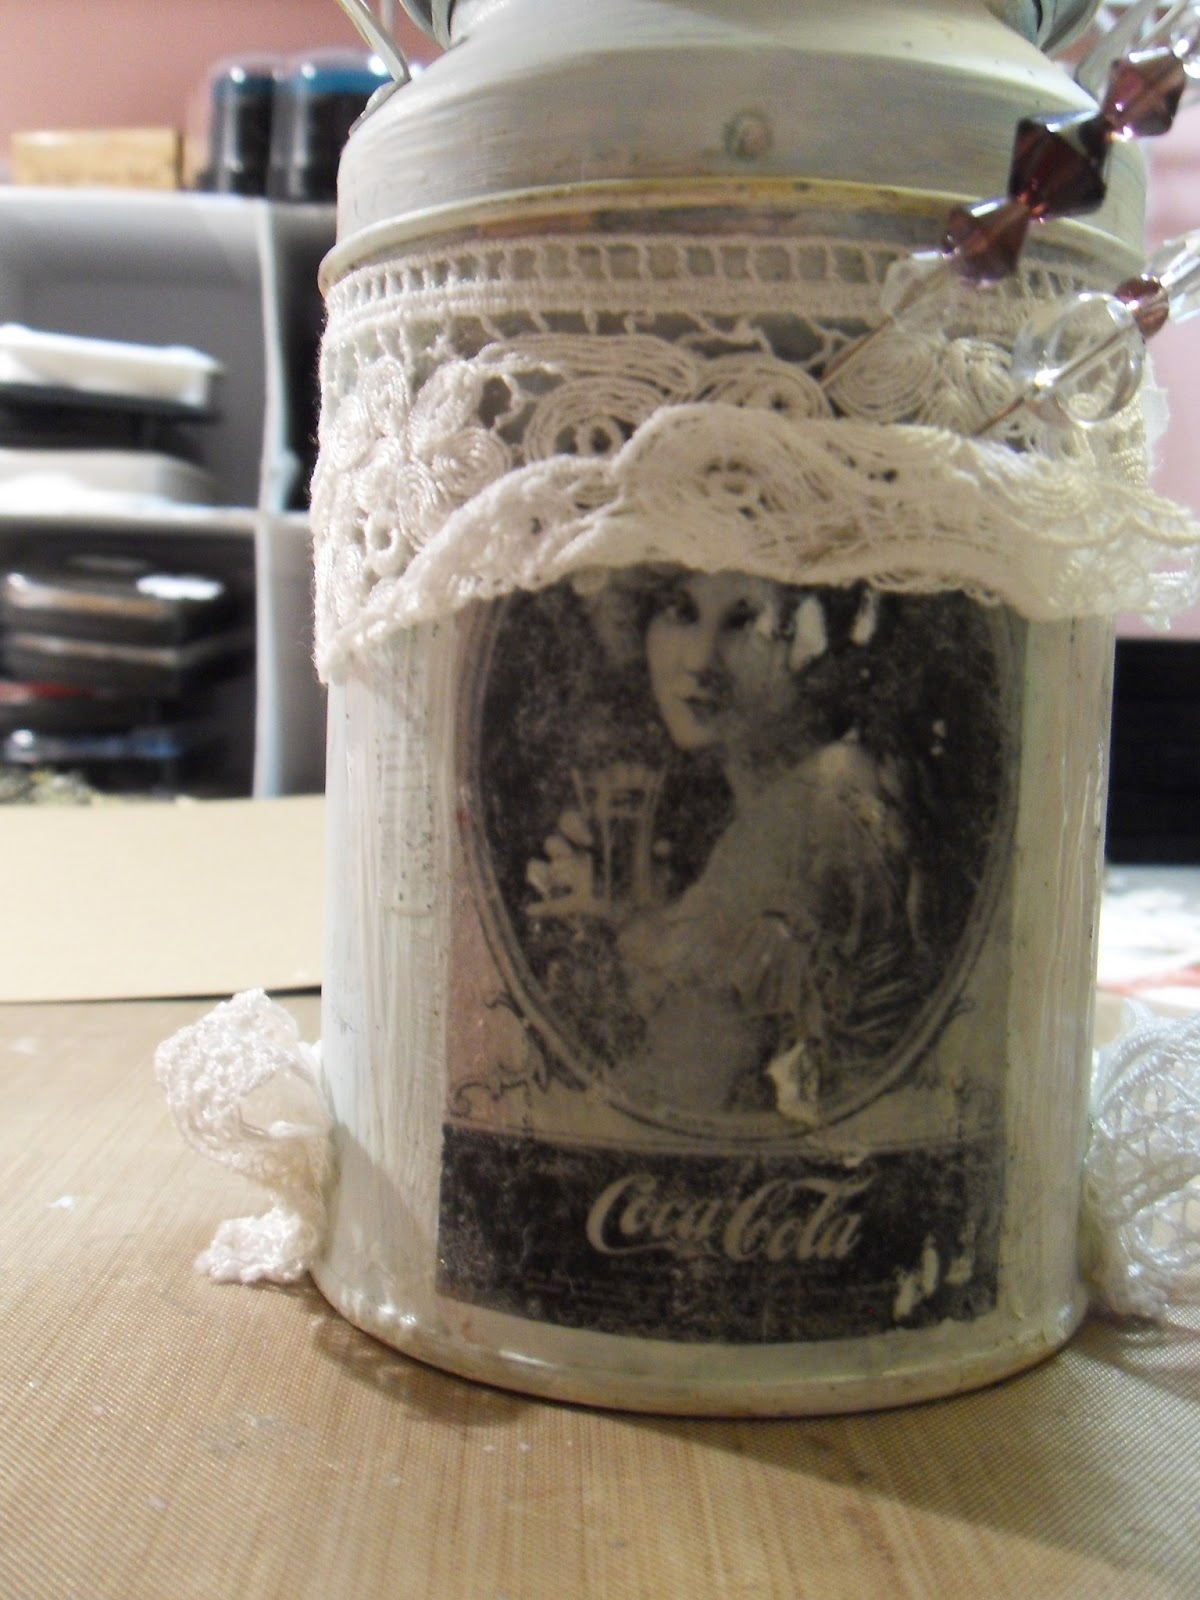
Vintage Altered Milk Tin

 
Hi! Today I am going to show you how
I altered my milk tin. The list of supplies I used are:

Sakura Hobby Craft Milk Tins
Sakura 3D Crystal Lacquer
Terri Sproul Shimmer Mixers
Adirondack Metallics Paint Dauber Gold
Vintage Graphics Printed from Laser Printer
Mod Podge
White Gesso
Lace/Trim
Embellishments
 
 
From now until the end of May you can get 20% off
your entire order with the code" Sakura05"
 
 
First I painted my tin with white gesso.
 Then I printed my Vintage Pictures Inverted
so when I Mod Podge my picture face down it would be a mirror image.


Next I Took a foam applicator and applied them to my milk tin
 
Then I placed my image face down onto my tin.
I did not mod podge after application as I did not
want a resist from the mod podge when I colored the tin.
 
When completely dry I soaked down the paper
with water and rubbed off the paper, creating a
transferred image with only ink remaining on my tin.
 
 
And as you can see my inverted picture is now facing the right way.
As I keep rubbing off the wet paper my image becomes clear.


I did the same method to my second image.
 
I mixed up some shimmer mixers from
Terri Sproul with water and binder powder.

Then I painted and drizzled down my tin and added some
gold paint rubbed in with my fingers until I was happy.

Then I took a rag and cleaned off my image
and cleaned the can a bit by rubbing it with a cloth.
 
 
Next I started to place my lace and embellishments.
 I used 3D Crystal Lacquer as well as hot glue. 


Here I made a flower embellishment with a piece of
 lace gathered and I used 3D Crystal Lacquer to adhere it with a pearl center.
 
 
 And the final photo..
 
 
 I hope you enjoyed todays tutorial and don't forget 
With Coupon Code  Sakura05
you can get 20% off your order!
for the entire month of May.


Friday, May 3, 2013

Milk Tin of DREAMS

Hi there!  I hope everyone is has had an AWESOME creative week!!

Today, before I begin my project I want to tell you about this amazing small business - Sakura Hobby Craft.  I was given this opportunity to be on their Design Team to showcase their products.  
I have never met them in person, but they do everything they can to please the customers and if we have a question.
All they ask in return is to check out their products and hopefully order from them.  Their products are not available anywhere else in my area and YOU are missing out if you haven't tried them!!!

OK - on to my project for this week.......My Milk Tin of Dreams.

As some of you know (those who follow me), I LIKE TREES!  I am concentrating on working on MY DREAMS this year and so what better way to have my dreams front and centre in my studio than on a Dream Tree.  The little milk tin from Sakura is the perfect container!


Its the perfect time to get branches around here, and before the ban on the Elm trees takes effect.  I cut one that had several off branches.  
In the bottom of the milk tin, I added some old metal printing letters I have had for ages - they are the perfect thing to weight down the milk tin so it doesn't become top heavy.
I filled the milk tin 3/4 full of an old matte medium that I was not happy with and its still not fully dry (I filled it last Friday)...its thickened more and more every day.
On the tin, I added a vintage scrapbook paper and glued on buttons.


On the tree, I added 2 strands of flower sequin string I made using the little flower sequins and perle cotton.  I made a knot between each sequin as they were added with a needle.

For the ornaments on the tree, I used some tags that I added photos to and then used the 3D Crystal Color Lacquer for added colour and dimension around the edges.  

I then tied more perle cotton on the tags and placed them randomly on the tree.  
I had small paper flowers in a little container asking to be used and so I glued them randomly onto the tree branches along with the butterfly.  


The Dream Tree can be images of all your dreams, or would make a great gift for the Mothers in your life with photos of all their children or grandchildren.

When you order this month, use the discount code: Sakura05 you will receive 20% off your total order.

Wednesday, April 17, 2013

3D Floral keychains

April is a month of birthdays in our family and I wanted to make something that would be able to be mailed inside the birthday cards without added too much bulk causing extra postage.

I have had a large ring of formica samples that I had found at a local thrift store years ago - yes, still using them up!
These samples are wood grain and then the usual formica material on the back.  I glued scrapbook paper scraps to the back of these.  I sanded the edge of the scrapbook paper and inked the edges.
This time, I decided to use the colours already mixed in the 3D Crystal Lacquer - Metallic & Pearl Set.
You can go as fine as you want, as its all about how much pressure you press on the tube.  You can tell which is my first flower...lol

They are very easy to work with and I LOVE how they smooth themselves out.  Back on a blog post I had done for my 52 Sparks, I had drawn a rose and I really wanted to try that with these keyrings.
I started with the centre colour, then did the leaves and then used the Metallic Silver to add the look of the petals.

I, also, love to add old book text to my artwork and these words fit on these keyrings (& fit for this week perfectly).  I used clear 3D Crystal Lacquer to glue onto the formica samples and then added a layer over top.

April is a great time to try Crystal Lacquer, because you can save 20% this month, by entering the code Terri04 when you check out at Sakura Hobby Craft.  You will be amazed at how easy it is to use!

Sunday, April 14, 2013

Brass Charms with Crystal Lacquer (and a coupon)

Brass charm necklace 3 (800x509)
This necklace was inspired by some charms I saw online.  The original charms were made with wire, paper and resin, but my version is made with brass blanks and Sakura Crystal Lacquer.  Crystal Lacquer made these so easy! 

I’ve seen lots of projects made with pattern tissue paper, but I don’t think I’ve seen any using the instruction pages that come with the patterns.  I wanted some interesting text for my charms, and decided to use pattern sewing instruction sheets.  You could use any kind of paper, but as a sewer, I have lots of memories involving these pages.

I had some brass blanks:
Brass blanks (800x469)
You could use any kind of metal.  Just make sure it’s hard enough that it won’t bend when you wear the necklace.  You could use precut blanks like these, or make your own.  If your metal seems too soft, you might try adding additional layers of metal, paper or Crystal Lacquer.    I think you could even make these charms with plastic as the base.

I chose my paper and then decided to add color to some of it.  I used watercolor paint, but you
could use almost any kind of paint or ink.  I liked the way the text still showed through very clearly with the watercolors.  I let the paint dry before proceeding.
Sewing pattern instructions (800x777)
Then I cut my paper to roughly fit my blanks.  For the first one, I traced around the blank directly onto my paper and then cut it out.  For the next few, I just held the paper on top of the blank and ripped the paper around the edges of the blank.  Then I tried holding the blank in place under or over the paper and cutting around the edges with the paper.  All three methods worked.  Tracing around the blank will allow you to decide exactly what you want to appear on your charm.  Tearing was much less exact, and I wasted some paper when it ripped in ways I didn’t want it to.  Holding the blank to the paper and cutting was simple, but I did get a few crooked cuts that way.

After I cut the paper to roughly fit the blanks, I shaped the paper to the blank more accurately by holding each piece of paper on top of its blank and dragging sandpaper across the edges.  It removed excess paper best when I pulled the sandpaper down in sort of a swiping motion.

Then, for each charm, I lifted the paper off the blank and applied a thin film of Sakura Crystal Lacquer with an inexpensive paint brush.   Then I laid the paper in place and put some Crystal Lacquer on top of it.  When it was dry to the touch, I added another thin layer of Crystal Lacquer.
The Crystal Lacquer acts as an adhesive to hold the paper in place.  It also strengthens and protects the paper and gives it a pretty sheen.  Crystal Lacquer is water soluble, so you can clean up messes as you go and you can clean and save your paint brush when you’re done!

Here are some charms I made from the instruction sheets without adding color:
Brass charms (800x297)
And here are some I made with watercolor paint:
Brass charms 2 (800x303)
I made the necklace from the second set.  I punched holes in each blank after the Crystal Lacquer was dry.  You could also drill the holes.

I love mother of pearl, and I thought buttons would be fun on a sewing-themed necklace.  Then I
added my favorite jewelry components, freshwater pearls and Austrian crystals.

Here’s another view of the necklace:
Brass charm necklace (2) (800x651)
During the month of April, you can use the code TERRI04 to save 20% on Crystal Lacquer at Sakura Hobby Craft.  Now is a great time to try Crystal Lacquer if you are new to it, or stock up if you already love it!

I hope you will make some Crystal Lacquer charms for yourself!  As always, I would love to hear about your projects!