Showing posts with label Terri Sproul Mixers - Shimmer Set. Show all posts

Monday, June 17, 2013

Chipboard Frame Magnet

Hi everyone!

For this week's project, I used Father's Day as the inspiration.

My husband loves working on puzzles during the winter. I had these chipboard frames that kept getting set aside and moved from place to place, so it was time to use them. They are 4 inches square.
I started by painting on Green pearl 3D Crystal Lacquer directly onto one of the chipboard frames.  The second frame will be the back, so I felt it could stay the way it was as the puzzle pieces would totally hide the frame.
I layered the puzzle pieces - some had text on them and some were from a child's puzzle.  I flipped the child ones over and used those.
I used the Blue Pearl 3D Crystal Lacquer all over the puzzle pieces once they were glued down.

I glued 4 pieces of the magnet strip onto the corners of the unpainted chipboard frame.  I, then, glued 3 of the sides of the two chipboard frames together to create a pocket for a photo.
This frame is now on our fridge.
Don't forget - for June, you can get 20% off your total purchase at Sakura Hobby Craft for the entire month of June by entering coupon code Crystal06 when you check out! 

Thursday, May 9, 2013

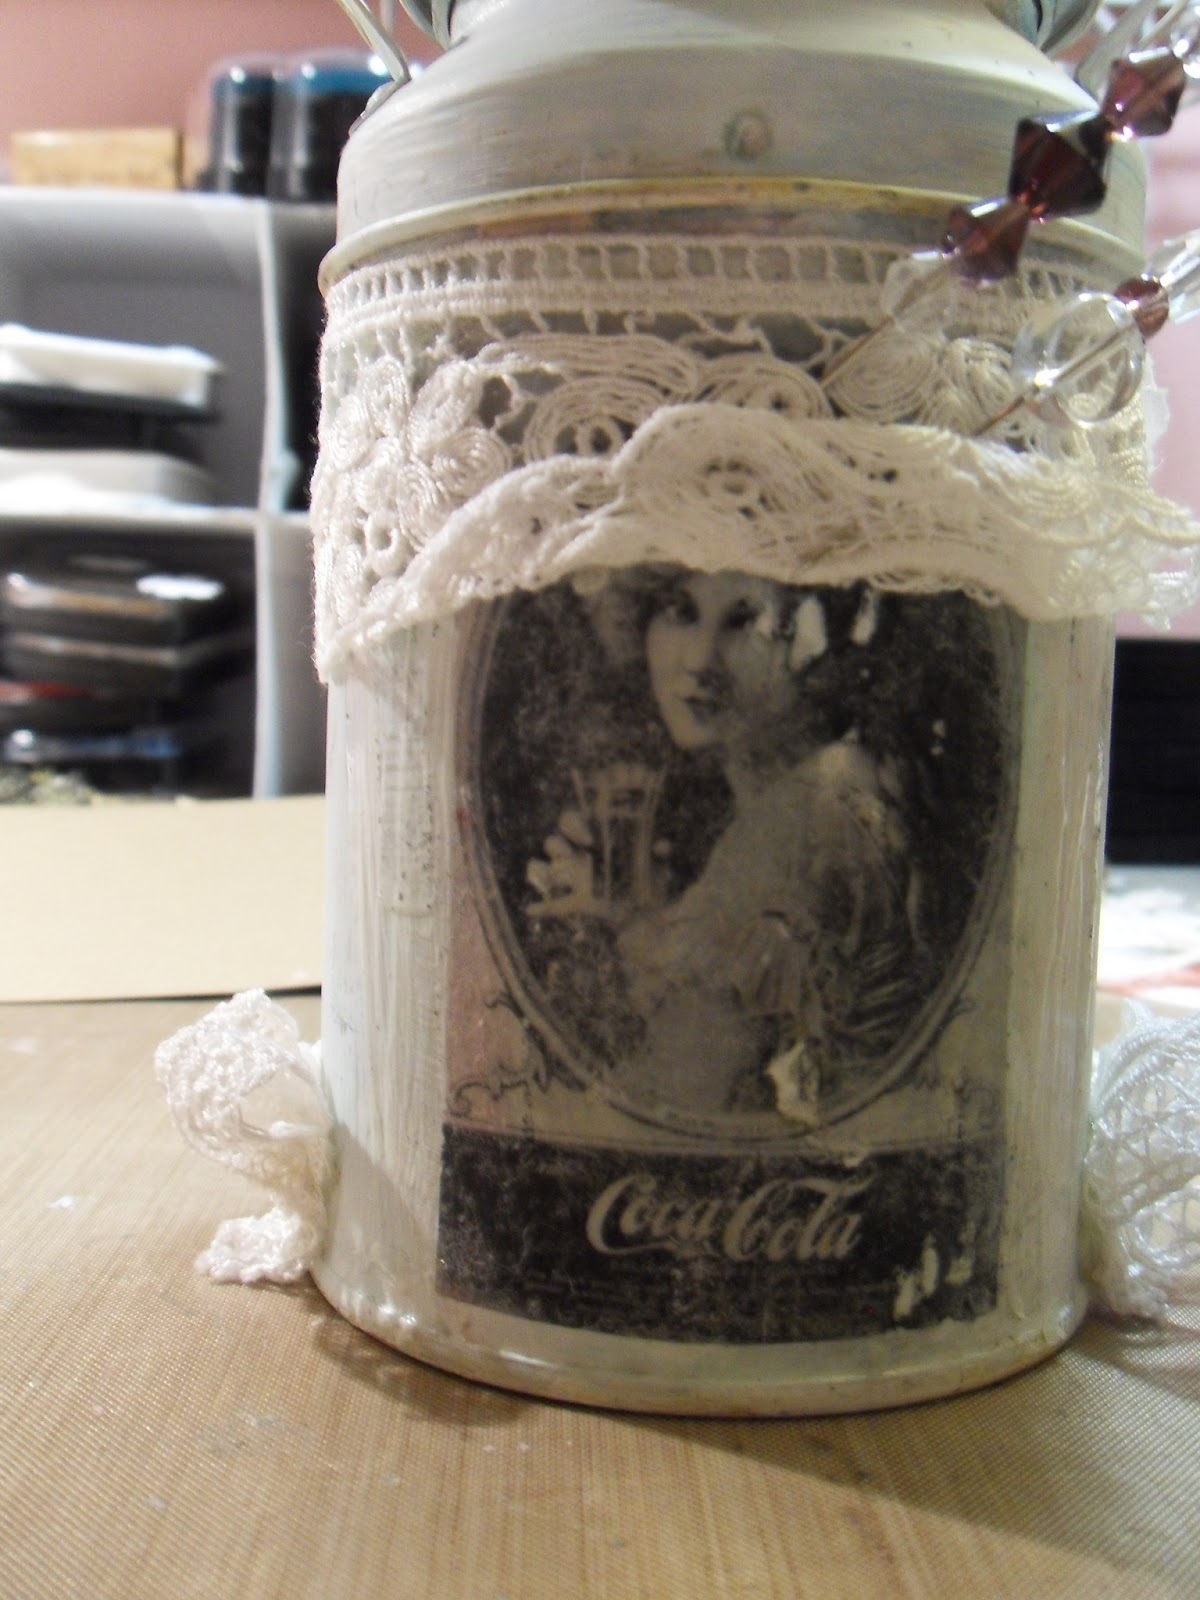
Vintage Altered Milk Tin

 
Hi! Today I am going to show you how
I altered my milk tin. The list of supplies I used are:

Sakura Hobby Craft Milk Tins
Sakura 3D Crystal Lacquer
Terri Sproul Shimmer Mixers
Adirondack Metallics Paint Dauber Gold
Vintage Graphics Printed from Laser Printer
Mod Podge
White Gesso
Lace/Trim
Embellishments
 
 
From now until the end of May you can get 20% off
your entire order with the code" Sakura05"
 
 
First I painted my tin with white gesso.
 Then I printed my Vintage Pictures Inverted
so when I Mod Podge my picture face down it would be a mirror image.


Next I Took a foam applicator and applied them to my milk tin
 
Then I placed my image face down onto my tin.
I did not mod podge after application as I did not
want a resist from the mod podge when I colored the tin.
 
When completely dry I soaked down the paper
with water and rubbed off the paper, creating a
transferred image with only ink remaining on my tin.
 
 
And as you can see my inverted picture is now facing the right way.
As I keep rubbing off the wet paper my image becomes clear.


I did the same method to my second image.
 
I mixed up some shimmer mixers from
Terri Sproul with water and binder powder.

Then I painted and drizzled down my tin and added some
gold paint rubbed in with my fingers until I was happy.

Then I took a rag and cleaned off my image
and cleaned the can a bit by rubbing it with a cloth.
 
 
Next I started to place my lace and embellishments.
 I used 3D Crystal Lacquer as well as hot glue. 


Here I made a flower embellishment with a piece of
 lace gathered and I used 3D Crystal Lacquer to adhere it with a pearl center.
 
 
 And the final photo..
 
 
 I hope you enjoyed todays tutorial and don't forget 
With Coupon Code  Sakura05
you can get 20% off your order!
for the entire month of May.


Monday, March 18, 2013

Sparkle and Shine Collage

Sparkle and Shine with Terri Sproul Mixers and Colors of 3D Crystal Lacquer.  Sparkle in the background and shine on top as accents and sealing the collage!

Sakura Products:

Terri Sproul Mixers - Shimmer Set
3D Crystal Lacquer, Clear and color sets


1.  Cut a piece of black matte board to 5"x7".  Use a "Dot" double-sided tape roller, and apply adhesive to the whole matte board.

2.  Brush the blue from the Shimmers Set using a big mop brush.  Dip the brush slightly into the color and burnish over the adhesive in various areas.  Leave some areas open for collage.

3.  Squirt a little clear 3D Crystal Lacquer onto a plastic lid or palette cup.  Brush the lacquer on the back of each pre-cut collage image, and press into place, overlapping various images to create the collage.  I used a little Distressed Inks over the surface in areas, to grunge up the image.

4.  Enhance collage by using various colors of 3D Liquid Lacquer - see the collage for ideas.  Once it is dried, cover the whole collage with clear 3D Liquid Lacquer.  Not only seals collage but adds a dimension like glass!

Please do not forget, Marches Discount on Terri Sproul Shimmers - add code when you check out!  Receive 20% off. 

Each month, the DT will bring you projects and ideas with various Sakura Products used in various creative ways.

Side Note:  This collage created with Sakura Products was published in Somerset Memories!!

Cre8tiveLea Yours - Lea

Wednesday, March 6, 2013

How to Create a C'est La Vie Shimmer Mixer Tile Canvas

Hi, I'm Mai Larsen new Design Team member of Sakura Hobby Craft.  I'm super excited to share with you today, my very first project on how to create a C'est La Vie Shimmer Mixer Tile Canvas.  I was inspired to create this Shimmer Mixer Tile Canvas by Livatnow.

I used several things to create my C'est La Vie Shimmer Mixer Tile Canvas and let me just tell you that it is not as hard as it looks.  It does take alot of steps, but the end results are amazing.  I loved playing with Sakura's 3D Crystal Lacquer.  I have tried several brands out in the market in the past to create 3D projects, but this one is definitely the best!  You don't have all the bubble issues with Sakura's 3D Crystal Lacquer, in fact you have none what's so ever.


Material used to make C'est La Vie Shimmer Mixer Tile Canvas:
Sakura Hobby Craft Products:
I also used:
  • Daler Rowney Simply Canvas  8 x 10"
  • Bo Bunny Country Garden Scraps
  • Hot Glue
  • Mod Podge
  • Gesso Canvas Primer
  • Mixing Cups
  • Apple Barrel Acrylic Paint Pink
  • Want2Scrap Diecut Paris Eiffel Tower
  • Prima Cling Mounted Stamps 
  • Large Voyage Stamp
  • Chipboard
  • Staz On Jet Blace
The Shimmer Mixer Tile canvas itself is 8 x 10″.    I cut the chipboard to fit perfectly on the canvas.  Now Livatnow uses wood, but I didn't have any so I used scrap pieces of chipboard and it had the same tile affects.  Sakura Hobby Craft 3D Crystal Lacquer and Shimmer Mixers really made this project fun and easy to do.
So, what are the steps, you may be asking, very simple and here you go!
Step One:
Gather your Supplies

Step Two:
Paint the 8 x 10" Canvas with the Acrylic Paint of choice.
Step Three:
Cut pieces of chipboard to fit on your canvas.  You can use wood pieces too, but to save on money and to use up scraps I already had, I just used chipboard and got the same affect.  Leave about a 1/8" grout space between the tiles.

Step Four:
Now apply Gesso primer to the chipboard with a paint brush.
Step Five:
Now with any scrap pieces of pattern paper apply or glue to the chipboard.  I used Bo Bunny Country Garden collection and used tore the pieces and trimmed the edges with the scissors.


You can use Mod Podge to adhere to the chipboard.  

Step Six:
With a large stamp and it can be any pattern.  Stamp the image to the piece of chipboard.  It can be random and it doesn't have to be perfect!  Just be sure to use a permanent ink like Staz On.

Step Seven:
Now that you have the image stamped, you can begin playing with the 3D Crystal Lacquer and Terri Sproul's Shimmer Mixers.  Go ahead and take out your disposable cups, something to mix with, and a paint brush.  Now, just be sure to work with this application immediately.  Don't premix until you are at this step, because otherwise it will dry up.


 Just randomly paint onto the chipboard!  Again its doesn't have to be perfect and that is what I liked about this project!  Once this dries and trust me it dries up very fast you can begin playing with other stamp images.  I applied the clear shimmer mixer over the entire piece to give it that extra clear shimmer touch.

Step Eight:
Now you can bring out your cling stamps and for this project I used Prima's Stamps!
Just stamp directly onto the shimmer mixer coats. 


Step Nine:
Distress the edges with distressing inks like Tim Holtz's Vintage Photo.  To seal it all I applied a thin coat of Mod Podge and let it dry.


Step Ten:
Apply Sakura's 3D Crystal Lacquer right onto the chipboard Shimmer Mixer Tile.  Apply it to the entire pieces and be sure to let air dry for several hours.  The 3D Crystal Lacquer will dry up in about 3 hrs so just set it aside and come back to it once it's dried.


Once they are all dry you are ready to apply these tiles to the 8 x 10 Canvas.  I recommend you use hot glue to apply it to the canvas.  I took pictures of how all these pieces fit on my canvas before I began working that way I knew where to place them all.

Well, that was my project, I hope you enjoyed creating it with me.  Be sure to stop by my blog at www.creandocondetalles.blogspot.com and leave me a comment and tell me what you think!  Happy Crafting.  

Visit Sakura Hobby Craft for your 3D Crystal Lacquer and Terri Sproul's Mixers at http://www.sakuracraft.com/. USE THE COUPON CODE TO GET YOUR TERRI SPROUL MIXERS TODAY!  coupon code is "Shimmer03" 20% off!!!! You can't BEAT that DEAL!


Monday, March 4, 2013

CD Magic

Hi, Lea here!  This is my first post for Sakura Hobby Crafts, but not my first works and other blog posts working with 3D Crystal Lacquer.  I look forward to sharing ideas and art to help motivate your creative MUSE!

As you see above, a March SALE!  Yes, key in "Shimmer 03" when you check out and receive 20% off your order.


As I promised on my blog, my project is this fun and ecclectic CD Pin.  Learn how to work with CD's and use TS Mixers with 3D Crystal Lacquer for shimmery color and as an adhesive!

Terri Sproul Shimmer Mixer's Set
3D Crystal Lacquer


Working with CD's:

Creating with CD's (or DVD's) gives you a surface in which to create jewelry. 

You will need:  A clip or oven mitt to hold CD, heat tool for stamping, and scissors (more utility, not used on paper).
     *Use the clip to hold CD or hold CD with the oven mitt. 
     *Heat CD for 30-40 seconds to get it hot.
     *Once heated, immediately cut the shape with scissors.  The CD might break, but don't worry the shapes are always interesting.  Drill a hole with a Dremel Tool or Hand Crank Drill.
     * Let the CD piece cool and then clean surface with any cleaner.  I use permanent ink cleaner.


Creating the Art:

1.  Mix the color/colors of TS Mixers with 3D Crystal Lacquer.  I use a palette cup to do so.  The ratio I used is 3 parts lacquer and 2 parts mixer.  I want the consistency a little thicker so I can push the elements into the surface.

2.     Use a palette knife (or any tool you want like old credit card, foam brush, etc.) and "frost" the surface of the CD.  Use one color or mix a couple!

3.  Press a small piece of art mesh into the surface first.  I have different sized beads and types, with and without holes.  Gem particles and Glitter Pieces work great with this design!  Stock up on a lot of different Sakura products to have on hand when needed.  Use an awl or tweezer when needed to push various pieces into the surface.  Do Not Cover The Hole you drilled.  Let dry.

4.  Edge CD with a color of Metallic 3D Crystal Lacquer.  It adds contrast and dimension to your art.  I went over the mesh following the lines with metallic lacquer as well.  Let dry.

Note:  If you are impatient on letting your lacquer dry (especially in humid states) Sakura Hobby Crafts has a UV Light which will dry your projects quicklly.

5.  Take 19-22 gauge wire, string beads and charms, attaching it through the hole of the CD.  Once it is all set, adhere a pinback to the opposite side of the CD so you can wear it!!!  The photo doesn't reflect the beautiful shimmer of the art.  Blingy without being too Blingy!!!

I am really Happy to be a part of this team.  I love to do unusualy art, lots of mixed-media and altered.  Even beyond that, when I want to create a dew drop or tear; Sakura products are there to help me create the way I want!!!

Cre8tiveLea Yours - Lea

Until March 19th, enjoy the wonderful works of the DT!!!  Enjoy and may your March Shimmer.


Saturday, March 2, 2013

Spring Blossoms

Spring Blossoms at Sakura Hobby Crafts

AAAHHH, the first signs of spring are starting to make themselves known. And none too soon if you ask me. And because this is my very first post for the Sakuka Design Team, I wanted to include one of my favorite things with all of you in this post.
"FLOWERS" 
I have a huge passion for bright colors and anything that reminds me of my garden. So I created this canvas piece to remind me of whats just around the corner.
"SPRING"
SUPPLIES
- Terri Sproul Mixers - http://www.sakuracraft.com/shop/Terri-Sprouls-Mixers/Jewel-Effects-Sets.htm
- Crystal Color Lacquer - http://www.sakuracraft.com/shop/3D-Crystal-Lacquer/Metallic--Pearl--Glitter--6-Color-SDet--Pen-Style-Applicators/p/3071-br--Metallic--Pearl-Color-Set.htm
- alcohol
- canvas
- stamps of choice
- Stazon Ink (color of choice)
- rub-ons, embellishments
- paint brush

 Step 1
- tap mixers onto the canvas with a paint brush as shown above

Step 2
- Spray entire canvas with a rubbing alcohol (above)
 Step 3
- let canvas dry or use a heat gun to set quicker

Step 4
- add stamped images (below)


 Step 5
- apply 3D Crystal lacquer for desired effect

 Step 6
- Add embellishments, word sayings etc.

I know many of my creative friends enjoy doing mixed media projects, so I hope that you will be inspired to use the products shown in this tutorial. I love how bright and shimmery the mixers are and I had a lot of control on where and how the alcohol affected the end result. If you would like to add some incredible color to your next project, it couldn't be easier than right now. For the entire month of MARCH, Sakura is offering you 20% off on the
SHIMMER MIXERS - COUPON CODE IS "SHIMMERO3"
YOU CAN ORDER THEM RIGHT HERE