Thursday, January 31, 2013

3d Crystal Lacquer Book Page Flower

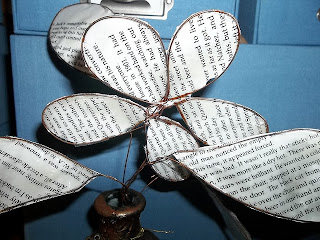
Finished Flower arrangement
At CHA I saw a chandelier that was embellished with resin paper leaves. I love that idea so I made a book page flower with 3d Crystal Lacquer.

Supplies:
Book Pages
3d Crystal Lacquer
Copper wire- I picked mine up in a large spool from home depot. I think it is called welding wire.
Transparent tape (like scotch tape)


Close up of flowers
 Directions:
Cut off about a 6-12" length of wire (this depends on how big you want your leaves and total arrangement to be). I wanted mine to have about 3" leaves so I cut off 12" and then i trimmed it off later. Make about 3-4 leaves, so that is 3-4 pieces of 6-12" wire.
Copper wire with top looped to make a leaf
Loop the top 4" around and twist it around the stem. You will need to shape your wire to form a leaf.

Tape the leaf down to the book page. You may want to find special words or sentences to highlight. You want to make sure that your wire lays flat on the paper or the 3d Crystal lacquer will seep under the wire. This may take some bending. You don't really need to worry about the tape because it is almost invisible after you lacquer the paper. I just overlap a little tape over the inside of the leaf.
Taped down wire. 

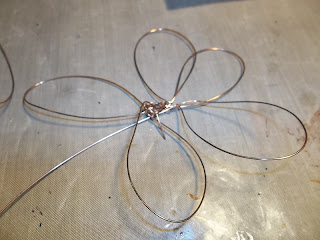
 Now you can create your flower. You can create individual petals and wire them together or attempt one big flower. I was getting tired of making leaves so i wanted to knock out one big flower. Most of the wire molding can be done by hand but I did have to pull out the pliers to wrap the inside of the flower. I left the wire on the spool while I make the flower, because I had no idea how much wire it would take.
Doesn't look perfect, but I can adjust it more later.
Tape the flower down to the book pages too.
Notice my flower already looks a little better.

 Now you can start filling in the 3d Crystal Lacquer. It is ok if there is a little seeping, because you can trim that off later, when we cut out the designs. We just don't want a lot of seep out. I actually had minimal seeping.


Once dry, flip the design over and lacquer the back.

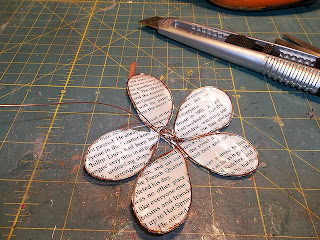
Now you can cut out your designs.
I used an exacto to get into small areas.

Your flower and leaves are now done and you can arrange them however you want. You could make a garland, earrings, ornaments, whatever! I think a butterfly would be cute! You could even add some of the mixers to the lacquer for added color.


Tanya

Tanya Ruffin


Friday, January 25, 2013

Did You see what we came out with at CHA?

Here is the new packaging for the Terri Sproul Mixer's and the new intro on how you can NOW use them as watercolors.


Hope you enjoy that,
Terri Sproul 

Tuesday, January 22, 2013

Valentine Tin with Sakura

READY FOR VALENTINES DAY?
Valentines is just a few weeks away!!!  It is time to get to work on the Sweet Valentines. Here is a simply way to dress up any tin or heart box, to put that special something for the LOVE of your life.

On the tin use Sakura 3D Crystal Lacquer to adhere a red paper doily, then a white doily layered on top. Cover with a thin layer of Sakura 3D Crystal Lacquer. With tweezers gently place large red seed beads around the edge of the doily. While the lacquer is still wet sprinkle with Terri Sproul Ultra Fine Glitter. Set aside to dry overnight.   Add another layer of Sakura 3D Crystal Lacquer and set aside to dry again. Adhere Tim Holtz flying bird with Sakura 3D Crystal Lacquer! Your tin is now ready to use!

Supplies:
Tin (5 x 5 1/2)
Red Doily
White Doily
Large Red Seed Beads
Bird Charm

Sunday, January 20, 2013

Valentine Candy Tin


Valentine Candy Tin - Sakura DT


It has been a while since I've been around here. A lot has been going on. Mostly the horrid flu has hit my house and had my son and I out of commission for 7 days!
Then when he was able to go back to school it was makeup work EVERY night, one night I had to help him study for 4 tests and somehow he pulled through with all A's.
Smart 12 year old. :)

Well I made this tin into a Valentine theme tin. I still need to buy the Hershey nugget candy and put "wrappers" around them to make it totally complete which I plan on doing closer to Valentine's Day and giving it to my son (he's 12) along with something else to give to his girlfriend even though he tried to tell me he wasn't giving her anything for a made up holiday. LOL.
Told him he better wait until marriage to try to pull that one.

This isn't the best picture. I tried to do it different ways to get the beauty of it but because the tin has a clear cover there is a glare that makes it look like there are double hearts in the picture and I took it without a flash. I even put paper in the bottom but I hope you get the general idea.

It really is beautiful in person.
And can't wait til I put the candy in there as well.

Supplies:

Tin with a clear window

 3D Crystal Lacquer - Primary Colors
(These are awesome!)

Tear Drops by The Robin's Nest
Helmar Quick Dry Glue

Directions:

1. Take the red and draw a heart with it. The 3D Lacquer colors are so easy to use and can use them like a pen to draw out your creation. Then fill it in slowly or else on the "film" of the tin it wants to run.

2. Then get various colors and draw squiggly lines next to it.

3. Follow up with putting some Helmar glue on tear drops and put them on the squiggly lines for great accents.

4. To really finish it off you can then cover up Hershey nuggets and put them in the tin.

I can't wait to try the set on glass. The effect it gives looks so neat in person. But be sure if you want to use more than one color close to each other that you allow the first one to dry.

Thank you for visiting!
Jamie


Friday, January 18, 2013

Steampunk Mardi Gras Mask Pin


In  Louisiana it is Mardi Gras Season. Everywhere you look you see king cakes, Mardi Gras beads and purple, green, and gold! So to honor my roots I created a Steampunk Mardi Gras Mask Pin. I took a resin face that I had previously poured (that had some imperfections in the left side), some metal gears, watch parts, 3d crystal lacquer and lacquer mixers and rub-n-buff.


Red Pearl & Shimmer Purple
Terri Sproul Mixers.
Watch Parts


Directions
Step 1.


Step 1.

Take resin face ( mine was poured. Few days before with black dyed resin)

Step 2.
Rub with rub-n-buff ( silver), to highlight the raised areas.


Step 2. 
Step 2. 

Step 3.
Take some 3d crystal lacquer and squirt a drop on your non stick mat and mix in a little of the Terri Sproul mixers. I used purple to highlight the eyes as eyeshadow and red to highlight the lips.


Step 4.
Step 4
Step 4.
Then start gluing ( using the 3d crystal lacquer as a glue) the small gears over the right eye of the face. I then use some small watch gears and cross the forehead.


Step 5.

Step 5.
I squirted more 3d crystal lacquer on the non stick mat and glue the three larger gears together. I didn't glue them directly t the back yet because the back of the face want even enough. Maybe using a thicker glue it might work, but I was trying the artfully arrange my large gears.


Step 6.
Step 6.
Once that dried I then pealed it off the mat and trimmed and then attached to the back of the face.


I had planned on some more Mardi gras embellishments, but I really liked my mask this way. Glue a pin on the back and you are done!

If you have issues gluing the three larger gears, you could attach the gears and mask to a circle piece of glass.

Tanya


TK Arts
Tanya Ruffin


Create Studios

Friday, January 11, 2013

Got Started Early On A Valentine and Sakura Hobby Craft


Sakura Hobby Craft has a lot of goodies besides just the Crystal Lacquer, Terri Sproul Mixers and jewelry findings. I was recently sent several wonderful metal boxes. I call them card boxes and we were told to decorate them in any way we wanted.
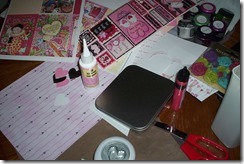
Here’s what I started with:
2023-02-23 19.45.28          2023-02-23 19.06.13
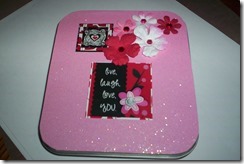
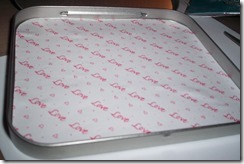
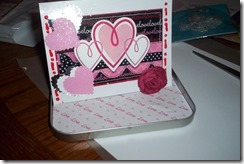
Does this look like some fun stuff to play with or what? I covered the outside of the box with some very sparkly paper (I love my bling). I used Sakura Crystal Lacquer as glue for everything in this project. Once I had the cover on I added Valentine pictures and then some flowers. I cut paper for the inside and used the Lacquer to adhere it to the inside and then I cut paper to use for a card. I added stickers, hearts that I had punched out from foil, sparkly paper and plain paper. I added a lovely flower and voila’ I had a card to insert into the box.

2023-02-23 19.45.51     2023-02-23 19.52.27
2023-02-23 19.53.31
I spread Sakura Crystal Lacquer all over the front of the card and then sprinkled it with Terri Sproul Extra Fine glitter. I just love how my first Valentine turned out!!! I love to read your comments, please leave me some.

Tuesday, January 8, 2013

Sakura's 3D Crystal Lacquer Primary Color Set!

I love playing with my Sakura 3D Crystal Lacquer.  This week I have been using Sakura's 3D Crystal Lacquer Primary Color Set. It comes in a pack of six 0.5 oz pen style applicator bottles with a fine tip. Includes: Blue, Violet, Green, Red, Dark Brown and Yellow.

Here are some ideas for 3D elements. The first is an embellishment I plan to use on a card that can later be removed and used as an ornament or sun-catcher.
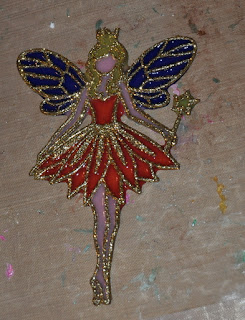
I found a pack of 12 fairy ornaments at Christmas and thought these would be great filled in with Sakura 3D Crystal Lacquer.
 
I laid the fairy on my craft mat and filled in the openings with lacquer.  On this fairy I have used violet, red and yellow. For the skin I used pink from the Sakura's 3D Crystal Lacquer Pastel Colors
I have added several applications of lacquer to get the thickness would like.  Set aside to dry until the lacquer has dried throughly before trying to remove from the mat.  

The second project is a 3D Valentine embellishment.  The hearts and frozen Charlotte are molded from paper clay. This embellishment will be placed on card also, later to be used as magnet.
On this project I used the yellow and red from the Sakura's 3D Crystal Lacquer Primary Color Set. (The colors in the photograph are a little off from real life!) The pearls were added with clear Sakura 3D Crystal Lacquer. Before the lacquer is dry sprinkle with Terri Sprouls Ultra Fine Glitter. 
The smaller heart was painted with the same red, but just a thin layer. Write on "I love you" or "Be Mine" with a Sharpie! Adhere magnet to the back.

Sakura Hobby Craft currently has a Design Team Call, 
check HERE if you are interested!!!

Sunday, January 6, 2013

Design Team Call


Sakura Design Team Call 2013

The Details –

*The Sakura Hobby Craft Design Team is for 6 months from March 1, 2013 – August 31, 2013.
* Create a minimum of 2 layouts/projects per month posting on both your blog and The Sakura Hobby Craft Blog – dates will be given when team in picked.  We are looking for Scrapbook layout and Cards
* Participation on the Facebook is a MUST.
* Submit work for publication.
* Be a part of one Blog Hop during the 6 months.  Date given at a later date
* Promote Sakura Hobby Craft by posting the above layouts/projects on other online galleries and blogs with working links to the store and blog.
* Sakura Hobby Craft has the right to post the projects you post on our blog also on our website, and facebook pages.  This includes Terri Sproul facebook page. 
* CHA project for booth – be given more information at a later date. 
The Sakura Hobby Craft Design Team will receive -

* The Sakura Hobby Craft products for your term, one large shipment, featuring each month and what products we are featuring that month.
* New Products release.
* Your bio and picture featured on our blog.

Sakura Hobby Craft is looking for a few awesome Mixed Media Artists to showcase Sakura Hobby Craft to showcase their New Paints and Crystal Lacquer, if you love to make Altered projects,  Card Project and Scrapbook Layouts, Jewelry and more.  
We're looking for talented artists and designers who know how to inspire others to create. For those that also seek opportunities to have their paper craft work prominently featured, Sakura Hobby Craft Design Team is a great fit!

What’s expected of an Sakura Hobby Craft Design Team Member?
* Ability to create compelling projects that showcase Sakura Hobby Craft products
* Experience taking good photos or scans of projects
* Active interaction with members of Sakura Hobby Craft facebook and blog as they discover YOUR WONDERFUL DESIGNS!!

What are the responsibilities of a Sakura Hobby Craft Design Team Member?
* The Sakura Hobby Craft Design Team is a 6 month hitch, from March 1, 2013 – August 31, 2013.
* Create a minimum of 2 layouts/projects per month. Post them on both your blog and Sakura Hobby Craft blog on your assigned dates each month. Date assignments will be given when the team is picked.
* Participate on Sakura Hobby Craft Facebook - this is a MUST!
* Submit work for publication. Sakura Hobby Craft will share project submission opportunities from their editorial contacts.
* Take part in one Blog Hop during the 6 months.  Date to be announced.
* Promote Sakura Hobby Craft Post projects created during your six-month term on other online galleries and blogs. Include working links to Sakura Hobby Craft blog and to products used on Sakura Hobby Craft website.

What are the rewards of a Sakura Hobby Craft Design Team member?
* Your bio, picture and link(s) on Sakura Hobby Craft blog
* Promotion of your work and projects to Sakura Hobby Craft Newsletter, Facebook and Blog members, a growing international community.
* FREE product
* New Products released or prior to release during your term as available. Standard confidentiality applies.


Apply today! Here's how:
1) Send your bio, blog address and facebook info to Terri@ultimatescrapbookretreat.com with “ Sakura DT applications” in the subject line (this way you don’t end up in Junk Mail – I get lots of spam)
2) 1st Deadline: Must have bio to Terri Sproul by Feb 13th (terri@ultimatescrapbookretreat.com).
3) 2nd Deadline: Submit/Post 1 project on your blog on or by Feb 14th 12AM EST to be viewed.
This post must include:  a) The Sakura Hobby Craft logo (you will be sent logo when you send your bio to Terri Sproul)   Step by step directions on how to make this project with links to Sakura Hobby Craft blog and website. Your submission project can be anything you love to make ... Scrapbook, Cards, Mixed Media, Altered Art, Eco-Art…  just think outside the box and impress me…
4) Join our facebook and blog  - this is a MUST and is very important to the success of our team!
5) All entries MUST utilize Altered Art Project.  Work submitted must be recent and can be previously published or displayed on blogs or online galleries.

What to include with your emailed submission –

* We want to know all about you! Send in your bio
* Please describe your style (genre): Scrapbook, rubber stamp, mixed media, vintage, altered art, eco-art, urban, etc.
* Why would you like to be on the Sakura Hobby Craft Design Team?
* Are you frugal, organized, have marketing ideas etc.. Please share what strengths you can bring to our team.
* Include the link to your active blog
* Are you active on any Forums or Message Boards? (Please List)
* Give an example of a class or technique you would like to share with
others. If it is one you have done previously please describe or link to it.
* Please list any other manufactures or store/kit DT’s you've been on or are currently on. Do you
have a scrapbook resume, or a link to a gallery,? Please share it with us.


Final decisions will be made the week of Feb 18th. Sakura Hobby Craft
Design Team will be announced shortly thereafter!!

Good Luck!!!!!

Wednesday, January 2, 2013

Funky Sacred Heart CD Case


Given a few supplies you can make a fun and funky decorated CD case. I may eventually turn this into a purse of sorts but right now I am just enjoying how cool this turned out.

I was pleasantly surprised to learn of Sakura's 3d Crystal Lacquer color sets, they made this project come to life. I have been having fun mixing up my own colors using the lacquer and the Terri Sproul mixers, but this is so much easier! My set just included the primary colors (and green and purple), so I made a very simple design.


Supplies:
Sakura's 3d Crystal Lacquer color set
Sharpie
Metal CD Case
Image to use as a guide


Directions:

Draw your image on the cd case. I just free-handed a design of a sacred heart surrounded by roses. I have a real simple rose pattern- a swirl with two leaves beside it.


Start coloring in your heart. The 3D Lacquer stays really well to where you place it (it doesnt run much), so you can go right up to the edge of your sharpied line. If you overlap, it is fine because the lacquer is transparent and you can still see the lines through the lacquer after it dried. Just try not to overlap the colored lacquer- unless you mean to!


Next add a little yellow to the center of the flame, before it dried you will add some red to fill in the outlines. then take a toothpick of a needle and pull the yellow lacquer into the red and vice versa, until you have a nice flame look.

I used purple to color the frame of the heart.  
 Next color in your roses. I added a touch of purple to the flowers and swirled it just a bit.


I also added a hint of yellow to the leaves. 


Finish coloring in your design. I also decided to add more flowers to the top of the heart.


I just love how fun and funky this turned out! It has a nice hard finish, so seems to be very durable. It may even survive floating around in my big purse!

I used a lot of red on this design, but it was worth it!


Tanya Ruffin