Saturday, December 31, 2011
Tuesday, December 27, 2011
CHEERS!
This week's project is quick and easy....and a great way to dress up your decor for any occasion!
Materials Used
That's it! I said it was quick and easy!
It's very important to work on a non stick work surface. I use a craft sheet from Ranger. I placed the pine tree sticker on the craft sheet and then went to town with my colored Crystal Lacquer. I used 2 shades of green for the tree and a brown for the trunk and just filled in the blank areas. I let it sit overnight.......very important here. Once it's completely dry, it peels right off the craft sheet and almost has a vinyl window cling feel on the back. In fact, I was able to move it several times to make sure it was straight. This is such a great idea to turn an ordinary clear glass votive holder, wine glass, vase - virtually anything into a very nice addition to your decor or party theme.
Here are the same stickers on a votive candle holder......cute!
I added some plain gold stickers in the background for a little more interest.....love it!
Here's wishing you a very Happy New Year!
and 'till next time......stay creative!
Visit Sakura's amazing blog here
Find out about all their amazing products here
Monday, December 26, 2011
Celebrate the New Years with Drink Charms by Sakura!
For this project you will need:
Accent Gems [glass blobs]
decorative paper of your choice [two side is not necessary.
22 guage wire and rosary pliers
Sakura Hobby Crafts 3D Crystal Lacquer
a tin [I upcycled a BB container]
accent beads to match your paper [I made my own]
Thanks for looking! May your New Year be filled with crafty goodness!
Accent Gems [glass blobs]
decorative paper of your choice [two side is not necessary.
22 guage wire and rosary pliers
Sakura Hobby Crafts 3D Crystal Lacquer
a tin [I upcycled a BB container]
accent beads to match your paper [I made my own]
| I adhered the glass blobs to my paper using Sakura 3D Crystal Lacquer. |
| I trimmed the glass blobs out of the paper |
| I fashioned a figure 8 out of wire using rosary pliers |
| I attached the figure 8 to the back of the marble with E-6000 for extra strong hold. |
| I then added a coordinating piece of paper to the back of the blob--pre-trimming where the paper lined up with the finding. |
| I then trimmed the remaining paper from the blob. lightly sanded the edges and applied Crystal Lacquer to the back. |
| To make the rings for the charms, I wrapped wire around a form that would be perfect for the glass stems [a nail polish top] |
| I used my rosary pliers again to make a hook and loop--if you plan to use small beads to decorate, you need to add them now before making both ends so that they can easily slide on. |
| I pre-cut a matching paper to fit the lid of the tin. Attach to tin with Crystal Lacquer. |
| I coated the lid with more Crystal Lacquer to have a snazzy tin to house the drink charms. |
| I made paper beads to match using the technique I showed you in my last post. This time I used my ½" bead template to create the beads. I have made it available for you to
download, as well as a ¾" bead template.
|
| Now, attach to your stemware to indicate which glass is yours! |
| This works for mugs too! |
Thursday, December 22, 2011
Heart Necklace
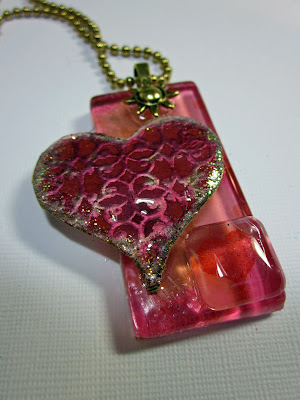
Sakura Hobby Crafts has some really fun products to make unique accessories! For this sweet heart necklace, I started with the Glass Tiles and glued some patterned paper to the back using the Crystal Lacquer. While that was drying, I stamped and embossed a heart on some chipboard. I filled in the recessed areas of the embossing with the Cerise colored Crystal Lacquer. After that was dry, I coated it with the clear lacquer, and sprinkled some fine glitter around the edges. This was then glued to the front side of the pendant. One of the very small glass tiles was added to the front corner, after I embossed a small red heart on the backside of it. The bail was attached with the lacquer, the chain was added - and I had a quick gift ready to go!
Wednesday, December 21, 2011
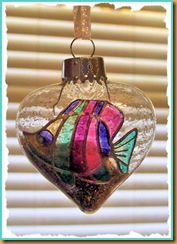
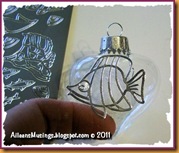
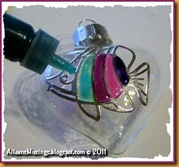
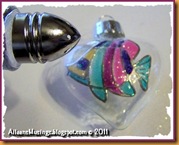
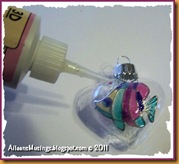
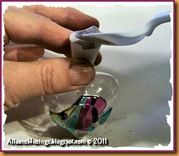
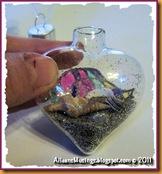
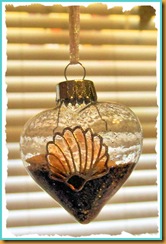
Stained Glass Tropical Ornament
Supplies
| 3D Clear Crystal Lacquer | SPARKRAFT Stickers |
| 3D Colored Crystal Lacquer | Iridescent Extra Fine Glitter |
| Glass Ornament | Sand and shells (you've collected from a beach visit) |
| Ribbon |
Add a ribbon and hang in
a window or on your tree.
For more inspirations visit
Monday, December 19, 2011
Reduce... reuse... REPURPOSE!
My husband jokes that if it isn't nailed down, it isn't safe! I can't say I agree... but, I certainly won't deny those allegations either!
The color Lacquer package... it's so strong! So sturdy, and thick, I just can't imagine throwing it away. So I didn't! I repurposed it! Created a snow globe of sorts!

I love Mo Manning's snowman and knew I wanted to do something with him. The 'tree' is from Making Memories, it was part of their Mistletoe collection a year or two ago. I gave the tree a good coat of Crystal Lacquer and added some Peacock Green gem particles. Once dry, I added 'ornaments' by using a variety of colored lacquer. The snow is flower soft, and the snowman was colored with Copics. Then of course, I tied it off with a big, beautiful bow!
Now I can use my packaging as a tag on a gift bag! I'd love to see how you recycle your packaging!
The color Lacquer package... it's so strong! So sturdy, and thick, I just can't imagine throwing it away. So I didn't! I repurposed it! Created a snow globe of sorts!

I love Mo Manning's snowman and knew I wanted to do something with him. The 'tree' is from Making Memories, it was part of their Mistletoe collection a year or two ago. I gave the tree a good coat of Crystal Lacquer and added some Peacock Green gem particles. Once dry, I added 'ornaments' by using a variety of colored lacquer. The snow is flower soft, and the snowman was colored with Copics. Then of course, I tied it off with a big, beautiful bow!
Now I can use my packaging as a tag on a gift bag! I'd love to see how you recycle your packaging!
Friday, December 16, 2011
Artful Journal by Becky Conley
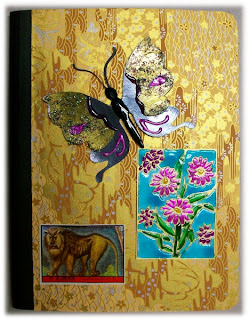
Hello!! Welcome to my bi-weekly Sakura post. This week I created two embellishments to adorn my latest artfully covered composition book.
SAKURA SUPPLIES:
Oriental Paper (coming soon!)
3d Color Crystal Lacquer
3d Pearl Crystal Lacquer
Peacock Green Gem Particles
Other supplies:
Composition notebook
large postage stamp
Outline Sticker-Sparkraft Enterprises, Inc
Black & White Card stock
Cricut: Rock Princess cartridge
sheet of double-sided super sticky tape (Therm-o-Web)
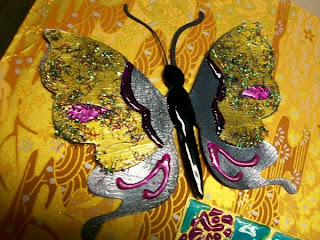
The butterfly was cut from black cardstock at 3.5" in two layers and brushed with 3d Pearl Crystal Lacquer in blue and gold. While it was still wet, I rubbed the gold layer through the Gem Particles then let dry. Then I assembled the wings and added more details with 3d Colored Crystal Lacquer and 3d Pearl Crystal Lacquer. I added dimension to the body with black 3d Colored Crystal Lacquer.

I applied the sticker to white card stock, then colored in the open areas with 3d Color Crystal Lacquer and 3d Pearl Crystal Lacquer. When it was completely dry, I trimmed it to the size of the sticker.

I put a sheet of super sticky tape on the entire cover of the composition book to apply the decorative Japanese paper, roll with a brayer to get any air bubbles out and to assure good adherence and trimmed the edges. Merely embellish the cover with artful elements. I kept this one relatively flat, I need it to travel well :o)
Thanks so much for stopping by the blog, please become a follower to receive updates and notices for new projects posted.
Cheers!
Becky
SAKURA SUPPLIES:
Oriental Paper (coming soon!)
3d Color Crystal Lacquer
3d Pearl Crystal Lacquer
Peacock Green Gem Particles
Other supplies:
Composition notebook
large postage stamp
Outline Sticker-Sparkraft Enterprises, Inc
Black & White Card stock
Cricut: Rock Princess cartridge
sheet of double-sided super sticky tape (Therm-o-Web)
The butterfly was cut from black cardstock at 3.5" in two layers and brushed with 3d Pearl Crystal Lacquer in blue and gold. While it was still wet, I rubbed the gold layer through the Gem Particles then let dry. Then I assembled the wings and added more details with 3d Colored Crystal Lacquer and 3d Pearl Crystal Lacquer. I added dimension to the body with black 3d Colored Crystal Lacquer.
I applied the sticker to white card stock, then colored in the open areas with 3d Color Crystal Lacquer and 3d Pearl Crystal Lacquer. When it was completely dry, I trimmed it to the size of the sticker.
I put a sheet of super sticky tape on the entire cover of the composition book to apply the decorative Japanese paper, roll with a brayer to get any air bubbles out and to assure good adherence and trimmed the edges. Merely embellish the cover with artful elements. I kept this one relatively flat, I need it to travel well :o)
Thanks so much for stopping by the blog, please become a follower to receive updates and notices for new projects posted.
Cheers!
Becky
Tuesday, December 13, 2011
A Christmas Wish
Believe it or not - I created this ornament in about 30 minutes - beginning to end. Fortunately, I had time to let it dry overnight, before it and me ran off to a Christmas party and ornament exchange.....
Materials Used
1 vintage glittered star
white crepe paper streamer
gold and pearl glimmer mist
gold and silver find glitter
white cardstock
music rubberstamp
distress inks in vintage photo, tea dye & black soot
I was in a pinch - invited to a party & ornament exchange and make some creative goodness for my design team assignment. I had these vintage star ornaments arranged in a glass bowl as part of my Christmas decor - and a bottle of Crystal Lacquer...what more could a girl ask for?
I made the rosette using simple white crepe paper streamers using about an arms length doubled - that took like 2 minutes! I'm doing good! Sprayed it with a little gold and pearl glimmer mist and hit it good with my heat gun. Next, I poured a good amount of Crystal Lacquer on a paper plate and mixed gold and silver glitter on another. I dipped the edge of the rosette into the Crystal Lacquer and then dipped in into the glitter mixture - so pretty!
While I set that aside to dry (it did dry in just a few hours, but I left it overnight for good measure), I ran to my computer and printed the words "A Christmas Wish" in a fancy little font and cut it out in banner style - distressed the edges and used distress ink on it for a worn vintage look. Next, the star...easy peasy. Using the same scrap of white cardstock I used for the banner, I die cut a star, stamped it with a music stamp and distressed it using black soot and vintage photo distress ink. All I needed was a little doodad as an accent. I coated a scrap piece of plastic leaf stem - using Crystal Lacquer and my gold/silver glitter mixture. When I glued the whole thing together - I used a glue gun for speed - I added 3 tiny vintage glass ornaments from my stash and I was done and very pleased with the outcome.
Update: I've been asked to make more for the other gals at the party that didn't get my ornament!
Hope you take the time to make some creative magic this holiday!
Please visit Sakura's website for product info and more inspiration! -
Till next time....stay creative!
Karen
Sunday, December 11, 2011
Lacquer Coated beaded bracelet!
Good morning!! We have less than 2 weeks left for Christmas shopping and gift making! I am in full swing on my creating and will share with you this fun bracelet that I've made for one of my loved ones!
For this project you will need:
paper
BIC Mark-its
Washi Paper
Tiger Tail Cording
findings
Sakura Hobby Crafts 3D Crystal Lacquer
Glass Tile
Gold Tone Star Bails
Thank you for looking! I hope you enjoy my project!
For this project you will need:
paper
BIC Mark-its
Washi Paper
Tiger Tail Cording
findings
Sakura Hobby Crafts 3D Crystal Lacquer
Glass Tile
Gold Tone Star Bails
| I cut the triangles with my paper cutter. |
| Following tips from a paper bead artist, I .used my BIC Mark-Its to edge the paper. |
| I then rolled the beads around a skewer, securing with 3D Crystal Lacquer. |
| I then coated the bead with the lacquer as well. |
| I allowed the beads to dry completely |
| and then strung them with accent gold-toned beads to form a bracelet. |
Subscribe to:
Posts (Atom)


