Tuesday, September 27, 2011

Fall has arrived here on the mountain....leaves are changing color and nights are getting cooler. Boxes of Fall decorations are being brought out from storage - which means one thing - Halloween!

I adore Halloween decorating (and I must admit the candy!) so I'd thought I would share a Halloween themed post to get a jump on all of Halloween's goodness.


I used vintage sheets of music for the cone, and old dictionary paper for the flower. This project is really fun because you can use whatever papers you have on hand to coordinate with any theme you would like!

I used a paint brush to apply Crystal Lacquer to the scalloped edge of the cone and sprinkled it with orange glitter.
After the glitter was dry, I rolled the cone into it's shape and used Crystal Lacquer to adhere it.
To make the flower, I used 2 scalloped circles of old dictionary paper, crumpled them up several times and sprayed them with several layer of Glimmer Mist.
I used this little guy for the center of my flower. Here he is coated in a nice thick layer of Crystal Lacquer. I sprinkled a little fine clear glitter onto the wet Crystal Lacquer and set him aside to dry.
I used a Tim Holtz stamp for the ticket, stamped it with black Distress Ink and embossed it with clear embossing powder. To color it, I used Crystal Color Lacquer. I squeezed a little out in a puddle on the side of the stamped image, and used an old giftcard to scrap it across it. I used both purple and orange Crystal Color Lacquer.
Here you can see how awesome the ticket turned out. After it dried, I distressed the edges using a distressing tool and black Distress ink. I used a Dymo Label Maker to make the "BEWARE" label and stapled it to the flower, shredded some black paper in my paper shredder and used it to fill the cone. For the finishing touches, added some black ribbon for hanging and filled it with some candy corn!
Till next time....stay creative!

Karen

Please visit Sakura Hobby Craft for more info on their products


Sunday, September 25, 2011

"Attractive" Charm Necklace set

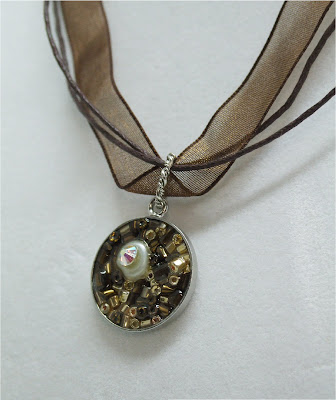
Happy Monday! When I opened my first package from Sakura Hobby Crafts, it included this wonderful jewelry making kit for their featured swirl technique to design with. To my amusement these white brass pieces were capable of being attracted by a magnet! Immediately I knew I wanted to explore that with my project.

For this project I used:
Swirl Kit A from Sakura Hobby Craft
Sakura 3D Crystal Lacquer [in kit]
Adirondack Alcohol Inks and Metallic Mixatives
thin magnetic sheet[recycled works good]
Small bits of cardstock, punches, embellishements

I began by coloring the White Brass with Alcohol Inks and Mixatives--these are excellent for adhering to the non-porous surface and make a background that helps camouflage non-perfect cutting of the magnetic inserts.


 I then measured the charm to figure out how big my magnets needed to be. I traced and cut out several magnet circles. Next I pealed off the old paper revealing just a thin magnet. I adhered the magnet circles with Crystal Lacquer to cardstock and papers for backgrounds--being sure to check which side of the thin magnet was attracted to the white brass.
I trimmed out the magnets, added some distressed stains or ink to the edge and then began building my inserts. I adhered all the parts with the 3D Crystal Lacquer. Edges that hung over were trimmed off to enable the insert to fit into the charm. An additional coat of lacquer over most of the 3D elements on the above insert was added.

Additionally I made several other inserts adding metallic lacquer and punchies, microbeads, or buttons to create festive alternatives. The inserts are very fun and will make for a fun necklace to celebrate a variety of seasons! Thank you for stopping by! I hope you like my project!

Thursday, September 22, 2011

Fun with ATC's


I love experimenting with Sakura's Crystal Lacquer! And I've come up with a technique, that I hope you will enjoy.


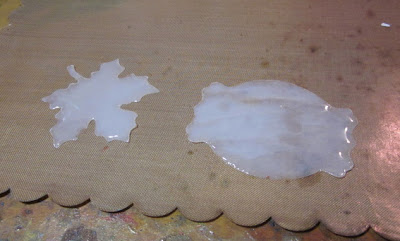
1. Choose some interesting dies, and cut wax paper shapes. Cover the shape with the Crystal Lacquer. Let Dry


2. I'll admit, I thought the dried lacquer would pull right off the waxed paper...but it didn't. But don't you worry! I've got the answer. Heat the waxed paper side for a few seconds with your heat gun. You can then peel it off revealing a die-cut shape of the Crystal Lacquer.

3. Choose embossing folders, and run the shape through your Cuttlebug machine.

4. You may either leave your piece alone, as it is - or add colors. I rubbed on Viva Decor Gold, and then buffed areas off. I also rubbed Stickles over the shape too. Finally, I inked the edges with Distress Inks.

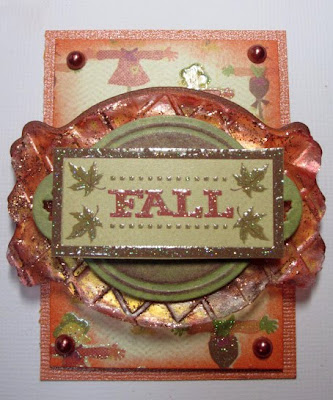
I had been going to do just one card, but decided to make a trio of ATC's. You can see the different textures that were created - and there's so many variations left to try!


For this last ATC, I die-cut my spellbinders, and inked the embossed area. Then I just highlighted those areas with the Crystal Lacquer. I also covered the little squares completely, to make them more like charms.

Thanks for stopping by today!

Wednesday, September 21, 2011

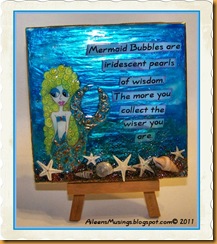
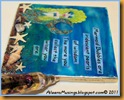
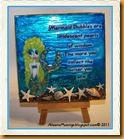
Ceramic Mermaid Tile

cl-tile11Supplies 
  • Micro Beads (Gold and Orange)
  • Mini Starfish and Shells
  • Extra Fine Glitter Dust
  • Gold Metallic Pen
  • Mermaid Image & quote (color photo copied)
cl-tile1
Step 1:  Start with a white
glazed ceramic tile and 3D
Crystal Lacquers.
cl-tile2
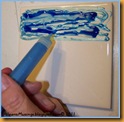
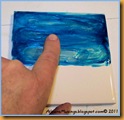
Step 2: Apply the pearl blue
and dark blue colored 3D Crystal Lacquer across the tile alternating colors.
cl-tile3
Step 3: Apply a layer of clear
3D Crystal Lacquer over the
colored lacquer and blend and
smooth with your finger.
cl-tile4
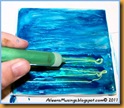
Step 4:  Apply the pearl green
3D Crystal Lacquer starting
3/4ths the way down the tile
to create an ocean floor depth.
cl-tile5
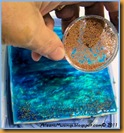
Step 5: Next while the lacquer
is still wet sprinkle micro beads
and extra fine glitter dust along
the bottom of the tile. Allow to completely dry.
cl-tile6
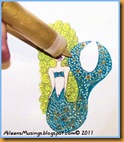
Step 6: Add accents to your
photo copied image using the
3D colored and pearl lacquer to
create depth on your image
and set aside to dry.
cl-tile7
Step 7:  Once your tile is dry
apply a thin layer of clear 3D
Crystal lacquer and ad your
quote you've copied and
cut out to your tile.
cl-tile8
Step 8: Next add your image to the wet tile and apply a liberal layer of 3D
Crystal Lacquer over your entire tile.
At this point you can also add your mini starfish and seashells to the wet tile as well (**If there are any air bubbles you can use a straight pen to pop them). Set aside to dry in a draft free level area.  Once dry repeat process as desired.
cl-tile10
Step 9: Once the tile is dry
completely color all four edges
with the gold metallic pen to
finish your piece.
cl-tile11
You can use a mini easel to
display your tile or you can
glue a hanger to the back 


Visit Aileen's Musings 
for more projects!

Sunday, September 18, 2011

Add a little bling to your cards!

Happy Monday my Lacquer loving friends!!

I'm kind of excited... this week I created some bling using German Glitter Glass! I used a jewelry finding from Sakura. Then I filled the bottom of the jewelry finding with Crystal Lacquer. I sprinkled in some of the Glitter Glass, and then topped it off with some more Crystal Lacquer (you can NEVER have too much lacquer!). I let it sit overnight before tying it onto my card.


I also added some Crystal Lacquer to the "O" (pumpkin). It gives it some dimension and a really nice finish!

I love using Crystal Lacquer on my cards. There are several others I've used the lacquer on... here are a few...

On this card I actually coated the whole butterfly image in Crystal Lacquer before rolling it in glitter!
(You can view this card HERE)

And on this card, I've added some Crystal Lacquer to the balloon and to the polka dots! 
(You can view this card HERE)


For this card, I used the Lacquer as an adhesive. I put down the Lacquer and put the flower soft on top.
(You can view this card HERE)

I hope you'll consider using Crystal Lacquer on your cards! Not only is it a great finish, but it's a great adhesive as well!! 

Hope you'll be able to fit some time in for your Crystal Lacquer! Would love to see what you create!

www.canyoupixelthis.com

Saturday, September 17, 2011

SAKURA ® Time Gears Charm


SAKURA ® Time Gears Charm


by Gloriann Irizarry


Materials


1 Gem Crafts Kit


Gears


1 Watch face


I used for this project the big square jewelry finding.


I started by coloring little swirls with black SAKURA ®.

I followed by adding some of my favorite copper tones.


Accent it with the silver tones some here some there not a perfect pattern just where your heart desired.


for best results let is dry over night.


You can add the gear on the charm whereever you like. I chose to add 3 small copper gears on each corner and add the watch face plate on the top left corner for accent piece.


Once you have your arrangement in place cover it entirely with the 3d Crystal SAKURA ® for protection and glossy end look.

Let it set overnight.


Once dry grab your favorite jump ring to add to the finding .


Get some ribbon and it will be ready to wear.


For this scrapbook style variation all you need is to create the background the same way you did for the Time Gears.

Once dry you will use your old favorite index card photos.


Cut and place photos the way you want the final piece to look and pour over some clear SAKURA ® .

Add you favorite accent pieces and let it set overnight.
I love to scrapbook so this piece will show case it every time I wear it.


This piece is very simple all you need is to create the background the same way you did for the Time Gears.
Then add you favorite colored SAKURA ® Don't let it dry over night.


Pour immediately some Twinklets Diamond Dust on your charm. This is glitter made out of clear glass. It will mix with the background bringing the wonderful colors right out.

When the light hits it it will really sparkle beautifully.


I love this quick variation. All you need is to pick your favorite colors of seed glass beads.


Pour some 3D Crystal SAKURA ® inside the jewelry finding and then add the glass seeds to the charm arranging them however you want. Let them lay flat and dry overnight for a very fashionable look on the next day.


I hope you enjoy this listing and feel free to make any suggestions or comments.


sincerely always,


Gloriann Irizarry


Thursday, September 15, 2011

Genie Bottle by Becky Conley


I had tons of fun playing with the 3d Crystal Lacquer!
I created this "bejeweled" Genie Bottle that could double as a bud vase.

Supplies:
Sakura 3d Colored Crystal Lacquer
Sakura 3d Colored Pearl Crystal Lacquer
Sakura 3d Clear Crystal Lacquer
Sakura 1x1.5 rectangle pendant blank
misc. cardstock and butterfly rub on, beads and wire
The Best Glue Ever (ScraPerfect)
Copper leafing
The Perfect Crafting Pouch (ScraPerfect)

I made the faux leading with the Best Glue Ever because when it dries, it is tacky. I used thick lines to mimic actual stained glass leading. LET DRY COMPLETELY until clear.
Apply the copper leafing.
Because the glue can still be flexible after drying, care must be used when rubbing off excess leafing. I used the Perfect Crafting Pouch and it was magical!

Next, I applied layers of gorgeous 3d Colored Crystal Lacquer to each area and drizzled or dragged lines of 3d Colored Pearl Crystal Lacquer.

While that is drying.......... cut a scrap piece of card stock and apply the butterfly rub on.
Glue into the 1 x 1.5" Pendant Blank and cover with 3d Clear Crystal Lacquer.

Bead the wire, attach the pendant and wrap around the neck of the bottle.

I am totally in LOVE with that purple 3d Colored Crystal Lacquer!!

Thank you for stopping by the blog, come back often for more inspiring and creative ideas.