Tuesday, April 30, 2013

Time Flies Altered Sakura Milk Can


I altered Sakura’s little milk can into a personalized treasure tin using Sakura Crystal Lacquer, paper, burlap and ink.
Here’s the milk can:


I measured the can and cut my paper to fit.  I have a stack of clock faces printed on heavy paper.  You could also use a stamp, a printed graphic or patterned paper.


My paper did not fit all the way around the can, so I cut a little extra piece.
I stamped my phrase on the paper with Colorbox Chalk Ink in dark brown (“Tempus fugit,” or “Time flies”).
 
I colored the paper with 7 Gypsies Color Wash (pastel green) and let it dry.


Crystal Lacquer is a great adhesive and it works on metal! I coated the back of the paper with Crystal Lacquer.  You could coat the can instead, but I felt like I had better control this way.  I poured a little Crystal Lacquer onto a plastic container lid and used a foam brush to apply it to the paper.  Then I placed the paper on the can.
 
After it felt dry, I applied a coat of Crystal Lacquer on top of the paper.
I made the burlap wings from the Angel Wings die by Sizzix.  The wing was too big for my can, so I cut one out of paper and trimmed it to use it as a template for trimming the burlap ones. 
 
 
I cut out the burlap wings and then trimmed then, using the paper wing as a guide:


For tips on diecutting fabric, please visit my tutorial here.
Then I added a little distress ink to the edges of the wings (vintage photo and rusty hinge):

I adhered the wings to the can with more Crystal Lacquer.  I put one on and let it dry before I added the other.  I put some Crystal Lacquer on the can and some on the back of the top part of the wing, then held the wing tightly to the can for a couple of minutes so the Crystal Lacquer could set.  Then I set the can on its side with the wing up and let the Crystal Lacquer harden before adding the second wing.
I added clock gears to the wings with more Crystal Lacquer and stabilized the can so they wouldn’t fall off before the Crystal Lacquer hardened.  I inserted a bottle into the can and then used two full bottles to keep the bottle/can combination from rolling:

Once the gears were on securely, my treasure tin was ready!


Sakura is hosting a blog hop on May 18th!  The theme is “Fantasy” and Sakura’s Design Team is dreaming up amazing art to share with you on that day!  There will be prizes, too!  So be sure to check back here on May 18th!

During the month of May, you can get 20% off your total order at Sakura Hobby Craft!  If you haven't tried Crystal Lacquer, now is the time to get some!  Sakura also has beautiful powders for coloring the Crystal Lacquer, and lots of jewelry findings!  Enter the code Sakura05 at checkout.


Saturday, April 27, 2013

Elephant pin


Good morning and thanks for coming to see another post for Sakura Hobby and Craft by me.  Today I want to show you how you can make your own pendant and making it look like it's under glass.  First I took an empty eyeshadow container and cleaned it out real good.  Remember to recycle as much as you can!!!  
I broke the case so that I could get the metal piece out.
and here it is.
Then I printed off a picture that I really liked (remember I am an elephant fanatic) and cut it down to size to fit snugly into the metal frame.
I then filled it with 3d crystal lacquer
and let it dry for about 24 hours.  It wasn't quit dry in time for the post, but the cloudiness will disappear, I promise.  Make sure not to touch it cuz you may leave a fingerprint...don't ask how I know this. 
I think I might put a pin back onto this and pin it to my jacket.

Don't forget you still have a few days to use the coupon terri04 to get 20% off of the crystal lacquer.

I hope you've enjoyed my little project and hope to see you again soon.  You can always find me here too.
As always, have a great day and God Bless.


Wednesday, April 24, 2013

Butterfly Lacquer Ring

I love wearing big bulky rings, because it just gives any outfit a special touch.  Last year I purchased a butterfly ring at a flea market in San Antonio, Texas, but during our recent moved I lost it.  So, my project for you this week was to great a butterfly ring using Crystal Color Lacquer by Sakura Hobby Craft.

There is totally something about butterfly that I love, and I think that it's because to me they represent a beautiful flight of freedom.  This butterfly lacquer ring is very easy to make and you can make just about anything from rings to even hair accessories just by simply using the Crystal Lacquer or the Color Lacquers.  Not only does this gave it color but it also gave it a 3 Dimensional look to it.


As you can see my youngest daughter had to be the first to model my new wearable Butterfly Lacquer Ring. She is just like her mama loving butterflies as well.

So, what do you need to create this Butterfly Lacquer Ring, well not too many supplies, because this is one project even your kids could make.

Materials Used by Sakura:

Other Materials Used:

  • Aleene's Jewelry & Metal Glue
  • Darice Stretch Adjustable Ring
  • Beading  NylonThread 
  • Pearl Bead
  • Any Bead Connecto ( I used Beyond Beautiful Flower & Gold Swirl Connectors)
  • Graphic 45 Metal Butterfly
  • Jewelry Tools:  Wire cutter
The first step is to gather your material.  Like any craft project it is a lot easier to work when you have everything there in front of you.  


Step Two:

Make sure you clean your surface that you are about to work with.  I just simply wiped the Graphic 45 Metal Butterfly with a damp paper towel.

Step Three:

Decide where you want to glue you beads to the butterfly.  Once you have decided where they go on the Graphic 45 Metal Butterfly using the Aileen Jewelry & Metal glue adhere them to the metal butterfly or surface you are working on.

Step Four:

Once glued you can begin applying the Crystal Lacquer if you want a clear finish or like me, add the Crystal Color Lacquer that you can purchase at Sakura Hobby Craft website.  What I like about the lacquer is that it dries very fast and it leaves NO bubbles, now that is AWESOME!  Once you apply this set it aside for at least one hour or until it's completely dried.

Step Five:

With the Darice Stretch Adjustable ring you can then take a pearl string the nylon thread and back into the opening in the center of the Graphic 45 Metal Butterfly and thread it through the holes on the adjustable ring. I glued on the backing using the Jewelry Glue just to give secure it better.

Once all that is dry you have a perfect ring for any occasion or like my soon to be 9 year old said, "perfect for her to wear to school."

You can use this same technique to make matching barrettes or pendents using the Graphic 45 Metal Butterflies and Sakura's Crystal Color Lacquer.

I hoped you enjoyed this project, and I hope to see you stop by my blog at www.creandocondetalles.blogspot.com.


Tuesday, April 23, 2013

Necklace with Pendant and Matching Earrings

Hi All! Today I would like to share with you jewellery I  made with 3D Crystal Lacquer and Terri Sproul Mixers. Some products I used today are:


3D Crystal Lacquer
Terri Sproul Mixers
Glass Beads
Jewellery Findings
Round Jewelry Bezel and Chain
Metal Gears
Teflon Craft Mat
Copic Marker B100
Envelope
Embellishments


From Now until the end of the month 3D Crystal Lacquer
is 20% off with coupon code below. 

I started with Crystal Lacquer on my craft mat
and mixed in some Terri Sproul Mixers


Mixed them together slightly and left to dry overnight. 
 
 
Once completely dry I cut into small pieces and
placed them into my round pendant bezel.
 
I filled my bezel with 3D Crystal Lacquer to cover all pieces.
I let this dry over night.
 
I took two pieces of hardened Crystal Lacquer and
made the bottom of the earrings by piercing a
hole into the lacquer with a piercing tool.
 
 
Then I layered the colored lacquer piece with a
metal gear and attached with a finding.
 
 
I put my glass beads in order and at the end of the
dangle I placed my gear and color lacquer.
 
Then, I colored all silver metal with my black Copic marker.
 
including the back of the bezel..
 
 
I added a black ball chain that I also colored with my
Copic Marker to complete the necklace and earing set.


I stuffed the envelope with the chain from the necklace.


I thought this would make a great little gift!
 
Thanks for stopping in and don't forget 3D Crystal Lacquer is 20% off with coupon code
Terri04  
But Only Until April 30th
 
You can purchase your 3D Crystal Lacquer HERE
 
Have a great day!
Warmly,


Sunday, April 21, 2013

Dangle Earrings

Dangle Earrings
The melting post came out, the mix got mixed and the fun began!

 I'm so excited about these earrings, seriously there is NO END to the design or elements that can be added to this mixing pot of wonder and brilliance.
Start by using the following items if you'd like to try making your very own jewellery pieces, it doesn't get any easier than this.
- melthing pot
- jewellery findings
- Embossing plate (hard plastic)
- metal skewer


Instructions

1. Pour Utee into the melting pot and let it melt.
2. Add Mica Powder to the melted Utee and mix well.
3. Punch holes into a metal tube and place a metal skewer into the tube. Pour the Utee directly into the center of the tube.
Let this HARDEN AND COOL. Remove the shape and remove the skewer.
OR pour the Utee mixture directly onto the template for a unique shape. At this point you could add embellishments to the Utee, be careful its VERY HOT and will harden quickly, so have your supplies and ideas ready to roll at this step. But if you don't like your design, you can remelt your Utee and start all over again.

4. Once your Utee/Mica shape is cooled, piece together whatever jewellery pieces, beads etc. to your piece. 
I made my Utee/Mica shapes into earrings and I love them. 
I hope you enjoyed this tutorial and will give these products a try, they are fun and easy to work with!

Don't hesitate to find me on facebook (Lee Brehon) if you'd like to ask me a question about any of the items I make using the SAKURA HOBBY CRAFTS

If you'd like to try the Crystal Lacquer for yourself, you can get 20% off of this product for the entire month of April - just use the code Terri04 at checkout.


Friday, April 19, 2013

Wedding Votives


Outline stickers and 3D Crystal Lacquer are a perfect Marriage together!!!  Sorry, for my pun! 
Here you have a votive, and for a wedding table decoration, all you have to do is, add the stickers and color with colored 3D Crystal Lacquer.

EASY - and many can be made quickly to accent the tables - How Beautful!!!  It is especially pretty with the light shining through on the lacquer!

There are 5 colored sets of lacquer to choose from and a new metallic set.  Find them here


Use any clear glass item and decorate them to your delight with these color sets.  I have clear magazine holders and I want to add the outline stickers to them and finish with 3D Crystal Lacquer, as well as cast vegetables in plaster then paint with the 3D colors.  That will be a project I will post when I finish them.

NOTE:  I used a small, fine, soft paint brush because I did not want a lot of dimension with the finished piece.  I added a little lacquer and moved it with the tip of my brush to spread into areas.

This idea works well on gretting cards as well.  This Christmas card was colored in with 3D Liquid Lacquer to create a greeting card.


Crea8iveLea Yours - Lea

Wednesday, April 17, 2013

3D Floral keychains

April is a month of birthdays in our family and I wanted to make something that would be able to be mailed inside the birthday cards without added too much bulk causing extra postage.

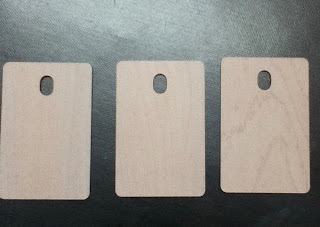
I have had a large ring of formica samples that I had found at a local thrift store years ago - yes, still using them up!
These samples are wood grain and then the usual formica material on the back.  I glued scrapbook paper scraps to the back of these.  I sanded the edge of the scrapbook paper and inked the edges.
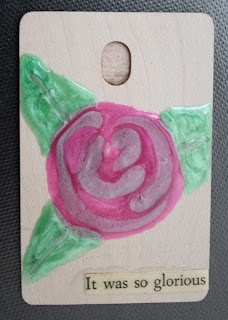
This time, I decided to use the colours already mixed in the 3D Crystal Lacquer - Metallic & Pearl Set.
You can go as fine as you want, as its all about how much pressure you press on the tube.  You can tell which is my first flower...lol

They are very easy to work with and I LOVE how they smooth themselves out.  Back on a blog post I had done for my 52 Sparks, I had drawn a rose and I really wanted to try that with these keyrings.
I started with the centre colour, then did the leaves and then used the Metallic Silver to add the look of the petals.

I, also, love to add old book text to my artwork and these words fit on these keyrings (& fit for this week perfectly).  I used clear 3D Crystal Lacquer to glue onto the formica samples and then added a layer over top.

April is a great time to try Crystal Lacquer, because you can save 20% this month, by entering the code Terri04 when you check out at Sakura Hobby Craft.  You will be amazed at how easy it is to use!