Showing posts sorted by relevance for query sbartist. Sort by date Show all posts

Wednesday, March 7, 2012

Painting Everything over the Rainbow with Crystal Lacquer
and the NEW Terri Sproul Mixers

Hello my name is Susan M. Brown {my web handle is sbartist} and I'm one of the new additions to the Sakura Hobby Craft Design Team. I will be sharing my projects with you on the first and third Wednesdays of each month.


Today I am going to share with you this first part of a TWO-PART post. Make sure to come back and see PART-TWO on March 21, 2012.

Being fairly new to Crystal Lacquer and the new Terri Sproul Mixers from Sakura Hobby Crafts, I needed to play. I have many ATCs and two Altered Books from my local swap and altered book club round robins to work on this month - so I decided to work on applying these wonderful products to my altered art projects. As a result, I have a few tips and tricks to share as well.

First thing I did was to mix up a sample of each color of Terri Sproul Mixers and paint them on the top and side of each pot of glittery goodness.

These are the six pots of Shimmers that I have. The colors look different on dark and light colors so I applied some on the dark lid and also a stripe of the color on the side of the white part of the label.
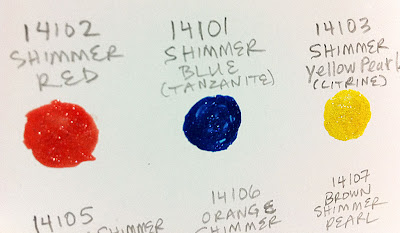
 

I also painted a swatch of each onto a piece of gloss cardstock labeled with each color and coordinating Sakura Hobby Crafts part number. I realize that my little color cards are not pretty - but they work for me. We would love to see how you make your color cards. Post yours on the Sakura Hobby Crafts Facebook page {CLICK HERE}.

 
These are the six pots of pearls colors and gold dust labeled on top and sides. Aren't they so lovely???

Meanwhile, since I mixed up about a quarter size of each, I didn't want the all the gorgeous colored Crystal Laquer to go to waste. So I got out some leftover papers from cutting out a drawer in an altered book. These are the perfect size for ATCs.


I put down a paper brushed with a little water and picked up the mixer color and painted it on. For most colors, I painted on both sides. This resulted in an aged paper look which has some translucency to it. I repeated for each color I made - this is how I ended up with all the lovely papers at the top of this post. AN INTERESTING DISCOVERY: Some of the colors {the green, red, pink and yellow pearls} pigment seeped straight through the paper, saving the step of painting both sides. The backside was lighter and not as strong - but an interesting and surprising result that was totally unexpected.

After painting - I set aside to dry on waxed paper - this absorbed
the excess moisture and kept my little colored pages from sticking.


Another experiment: I made a test of just Crystal Lacquer on the book page to see if I could achieve the same look of an oil or resin coated paper. The result is YES!!! I poured about a quarter size of Crystal Lacquer on the page and spread it out on both sides. I let it set for a couple minutes, then dipped the tip of my brush in water {very little} and brushed it over. The Crystal Lacquer soaked through the paper and became translucent with the feel of vellum when dry. This will be a nice starting surface to work on for altered projects.

This piece above is two pieces that I laid on top of each other
and were fused before I could pull them apart. I love how the
translucency of the two papers are visable.

OK - on to the next burning question:
CAN YOU MAKE AN IMAGE TRANSFER
using CRYSTAL LACQUER???? 

YES!!!

In part two on March 21st, I will go more in depth with a full step-by-step of this process. Basically I followed the same process as you would with an acrylic gel medium. Paint four or five layers in alternating directions {horizontal, then vertical, then horizontal, then vertical, etc.}, letting each layer thoroughly dry before adding next layer. Then after waiting 24 hours to dry, soak in a shallow dish of water and in a circular fashion, rub away the paper fibers from the back side of the image until paper is removed. Then you let dry ANOTHER 24 hours. TOO MUCH waiting to dry! I will say - with Crystal Lacquer - this process is accelerated by not only hours...but days! I love making image transfers, yet the process of it is so dragged out unless you do a box tape transfer {with this you are limited to the width of your tape and you get a super high gloss sheen from the tape}. I will be doing this so much more now! So I made a couple image transfers one of me at about 2 1/2 and the other of a photo of my father and I.

 Image transfer being removed from water after paper is rubbed off.

With the painted papers and the completed image transfer I created a tag. All items are adhered down with Crystal Lacquer {you may want to wear gloves for this - its quite sticky}. **A TIP** I use a plastic heavy-duty brush that I purchased at a beauty supply store - the kind that is used to apply hair-coloring at your hair salon. These sturdy plastic brushes don't break down from adhesives and are really durable. If the Crystal Lacquer dries in this brush - no worries - I let it soak in water ovenight, then scrub it with my dishbrush to get the glue fibers off. And no bristles to be picked out of my work in the process.

On a base tag - I glued down three of the painted
papers with Crystal Lacquer.


The Crystal Lacquer dries relatively quickly. I added some white pastel in the area where the face of my image transfer will be placed to mute some of the text. I brushed over with Crystal Lacquer, then after misting lightly with water, I applied the image transfer and gently rubbed into place with Crystal Lacquer on top as well to seal. I mixed up some more Voilet Shimmer Mixers and painted in the background around my adorable self. I learned to paint at a very young age...my first paint being Chocolate Cake!


A couple unexpected BONUSES!!!

The paper towel I had been using to dab off my painted papers dried to be a lovely shimmery pastel modeled gem to be used in the future. This will be lovely as a background in a vintage fairy altered book I will be working on very soon. Nothing goes to waste in this studio.

 AND....look at what was left from rising my brush after each color...
a beautiful pearly mixture of Crystal Lacquer, multiple mixer colors
and water...A GIFT!!!!

Introducing my very own HAPPY ACCIDENT...
Terri Sproul MIXERS MIST!!!!

   
I just poured my paint liquid into an empty spray bottle
and I have a lovely, sheer shimmer spray. YAY!

I hope you enjoyed today's post. I encourage you to take a look around through the projects from the other Sakura Hobby Craft Design Team members for some great tips and ideas! Make sure to come back and see PART-TWO on March 21, 2012.

If you have any questions, please leave a comment, select receive e-mail follow ups on comments and I will respond. If you would like to see more of my creations, please visit my blog sbartist : painting in the dark by clicking here.

Have a wonderful Wednesday : )

Wednesday, August 15, 2012

Turning a "Good Fortune" into a Stylish Altered Bangle

Happy Wednesday! What do you do with a leftover cardboard tape spool and a fortune from a fortune cookie??? Susan back again to share another project I've created using Sakura 3D Crystal Lacquer with Terri Sproul Mixers - this time I'm GREENCRAFTING!!!


I've made a CHIC artistic bangle out of a recycled cardboard tape spool that I have painted with Sakura 3D Crystal Lacquer and Terri Sproul Mixers and collaged with stamped paper misted with my Mixers Mist. The feature of my bangle is a fortune that I saved from a fortune cookie.


I cut a section away from the tube and cut the edges rounded. I sanded the edges with an emory board.


On a strip of scrap patterned paper, I stamped I used Viva Las Vegastamps! patent stamp #1687 with waterproof royal blue ink.


I misted paper with my sheer Mixers Mist to dampen paper. CLICK HERE to see post on how to make your own Mixers Mists.


Gently crumple the paper to break up fibers to that it is not so stiff - AND - it will give a nice suede texture.


I also misted with some bronze/copper penny Mixers Mist to add extra shimmer and this brings out detail of distressed paper. I set aside to dry.


I mixed up some Sakura 3D Crystal Lacquer and Garnet Pearl and Garnet Shimmer Terri Sproul Mixers to apply a base layer to the bangle.


I apply Garnet Mixers to base of tube with 2-3 coats to seal paper and also to build up a nice layer of color.


Completed painted cardboard bangle - which looks lovely just like this! But this is just a starting off point...I want to make it more "ME". So I'm going to make it all painted and inky, too! 


Now I adhere the stamped and painted paper I prepared in the beginning. I cut lines into the paper around the rounded sides to get a smooth wrap-around. I mounted my fortune to a rectangle of chipboard and adhered to bangle with Sakura 3D Crystal Lacquer. I finished off by painting entire bangle in a nice coat of Crystal Lacquer.

Presenting "Art-cycled" CHIC Bangle


My bangle is all artsy and recycled! It looks lovely...and is the perfect home for my GOOD FORTUNE "You feed your body every day. You must also feed your mind".

I hope you enjoyed today's post - and all of the projects I have created during my time with the Sakura Hobby Craft Design Team! I have had a wonderful time creating with Sakura Hobby Crafts products and I look forward to what the new Design Team dreams up. If you would like to continue to keep up with me and my creative adventures - please visit my blog sbartist : painting in the dark by clicking here.

Keep Creating! Sb : )

Tuesday, May 15, 2012

Adding Depth and Dimension to Vintage Images using Sakura 3D Crystal Lacquer and Terri Sproul Mixers

Happy Wednesday! Susan back again to share another project I've created using my Sakura 3D Crystal Lacquer and Terri Sproul Mixers. 

Today I am adding accents and dimension to a vintage Holiday image using Sakura 3D Crystal Lacquer and Terri Sproul Mixers via a video how-to.

A brief description of how I started. I purchased a digital vintage image from AlteredPages.com. This is a vintage Christmas greeting {AP single 601} of a holiday storefront window. I printed out four copies onto a matte finish white cardstock. I figure four versions will be enough so that I can accent and dimensionalize the base layer, then add paint in accents to sections of the figures that I will cut out and raise with pop dots for a faux 3-D effect. I am going to accent the details using different colors of the Terri Sproul Mixers and also make the window dimensional by painting with Sakura 3D Crystal Lacquer and streaks of blue colored Crystal Lacquer.

Please watch the following video to see my process {you may want to grab a snack and a drink now}.

Video streaming by Ustream


I let my dimensional window dry all day until the cloudiness has turned clear {this was easy because I had to leave for work LOL}. I cut out the figures and sections to build up layers with 3D pop dots. Before adhering, I went around the edges of the pieces with creamy brown Cat's Eye Chalk ink.

Completed Embellished "Holiday Window" Image


This project has gone from subtle and flat to luxurious and dimensional. I just love the reflective qualities of the micas in the mixers. I originally planned to use this as a feature element for a holiday card - but it is so lovely, I think it will have to become a shadow box that will be cherished with my collection of handmade Christmas decorations.

I hope you enjoyed today's project. I bet you can't wait to run and get your Sakura Crystal Lacquer and Terri Sproul Mixers and get to your studio and play! Please take some time to stroll around through projects from the other Sakura Hobby Craft Design Team members for more great tips and ideas! See you next time on June 6, 2012.

If you have any questions, please leave a comment, select receive e-mail follow ups on comments and I will respond. If you would like to see more of my creations, please visit my blog sbartist : painting in the dark by clicking here.

Have a wonderfully crafty Wednesday : )

Wednesday, June 6, 2012

"Yes I Can" Art Journal Page using Sakura Crystal Lacquer, Terri Sproul Mixers and Want2Scrap

Happy Wednesday! Susan back again to share another project I've created using Sakura 3D Crystal Lacquer with Terri Sproul Mixers...and to mix things up a bit - I'm also using some Want2Scrap chipboard and embellishments.

I'm finding that the more I create...the more I need to create. I have accumulated quite a collection of inspirational quotes. So I have decided to have some play time and start an Art Journal. Today will be my first entry and the quote I am using is "YES I CAN."


I begin with a brand new unused blank journal and these...and start to collage.


As my base, I glue down a vintage sheet music book page from AlteredPages.com. Then I primed the background with a gesso/acrylic mixture. 


I mixed up some Red Pearl Mixers for painting the paper doll and I used the leftover to paint a border around my book page. 

I painted the sky with a mixture of 3D Crystal Lacquer and Smokey Quartz Pearl, Violet Pearl and Shimmer Tanzanite Terri Sproul Mixers to create a sky and  I used Green Pearl for the water. I keep the mixture translucent so the book page is still visable. I assembled the chipboard paper doll with embroidery floss. I arranged the figure as if she's flying and adhere to the page. 


I cut out the shape of a dress for my flying muse using pre-painted book paper that has been painted with Crystal Lacquer and Red Pearl Terri Sproul Mixers. I used some variegated yarn for my muses' hair. I cut a section of roses from the blue rose ribbon and adhered down to be a wave like pattern in the water. This creates some fabulous texture. I cut out a Citrine Pearl painted book paper moon shape and adhere to my sky. I added some pastel color for depth and dimension. I apply light green rhinestones randomly for stars in the sky to complete the scene.

The finishing touch is to add my quote "Yes I Can" with clear Gold sticker letters. This free-form project is colorful with subtle texture within the imagery.

Presenting my Completed Art Journal Page


This page will be the first of my new creative inspiration art journal. I hope to fill the entire book with my favorite quotes and colorful inspiring art.

I hope you enjoyed today's project. Please take some time to stroll around through projects from the other Sakura Hobby Craft Design Team members for more great tips and ideas! See you next time on June 20, 2012.

If you have any questions, please leave a comment, select receive e-mail follow ups on comments and I will respond. If you would like to see more of my creations, please visit my blog sbartist : painting in the dark by clicking here.

Have a wonderfully crafty Wednesday : )

Tuesday, June 19, 2012

Altering a Want2Scrap Corset using Sakura 3D Crystal Lacquer and Terri Sproul Mixers

Happy Wednesday! Susan back again to share a project I've created using Sakura 3D Crystal Lacquer and Terri Sproul Mixers...along with Want2Scrap chipboard and embellishments. I've created a pretty wall decor using one of Want2Scrap's specialty chipboard blank books - the CORSET.


Want2Scrap has loads of interesting chipboard and acrylic blank books, words, shapes and tons of frilly and blingy items to embellish them with. I begin with two blank corset pages.


Chipboard Corset Album has 5 pages and measures approx. 11 1/2" long x 7 1/2" wide.


Blue Rose Ribbon is fantastic for borders or as a stand alone item.


Using a stylus I marked some lines on the chipboard shapes, then cut two of the five corset pages accordingly. I want to make my corset more dimensional by adding layers.


I punched holes for lacing the corset on both sides. **A TIP** to get the holes the same on both sides, I laid the two sections on top of each other and punched them at the same time with my Crop-A-Dile.


Using a detail tipped applicator, I applied stripes and scallop details with a mixture of 3D Crystal Lacquer and Green Pearl Mixers.


I mix up some Shimmer Tanzanite Terri Sproul Mixers with 3D Crystal Lacquer to paint in my background. For the peek-a-boo layer, I applied a mixture of Violet Pearl Mixers and 3D Crystal Lacquer.


After paint is completely dry, I apply and set eyelets for lacing.


I cut a section of roses from the blue rose ribbon and adhered down to be the frill at the top of the corset. I just love the texture and detail these add to the corset. I use the chipboard scraps I cut away as spacers to assemble sections together. Nothing goes to waste here. The eyelets and ribbon will need extra space between layers so these will be perfect to balance the layers out. I laced up with a plaid ribbon tied off with a purple satin at the top. I finished off the bottom edge with a piece of lace and also at the top of the peek-a-boo.

Presenting "Of Corset's an Altered" Want2Scrap corset.
"You are all laced up and ready for the party Miss Scarlett..."


I hope you enjoyed today's project. Please take some time to stroll around through projects from the other Sakura Hobby Craft Design Team members for more great tips and ideas! See you next time on July 4, 2012.

If you have any questions, please leave a comment, select receive e-mail follow ups on comments and I will respond. If you would like to see more of my creations, please visit my blog sbartist : painting in the dark by clicking here. Have a wonderfully crafty Wednesday : )

Wednesday, May 2, 2012

Making a Magic Mushroom Using Sakura Crystal Lacquer and Terri Sproul Mixers

Happy Wednesday and welcome to May! Susan here to share another project I've created using my Sakura Crystal Lacquer and Terri Sproul Mixers. Spring is in full bloom so I wanted to make something fun and whimsical...and what could be more perfect than a Magical Mushroom!!!


You never know where inspiration or alteration will present itself so you have to always be on the  lookout. I came across this paper maché mushroom in the craft store dollar bin and it was calling out to me... "PAINT ME!!!" I just couldn't resist.


This seems to be the perfect specimen to paint using Sakura Crystal Lacquer and Terri Sproul Mixers.


First, I gently pulled the stem apart from the mushroom cap for easier handling to paint.


Then with a push-pin, I poked some holes randomly to receive brads after painting. This is a styrofoam base with brown paper maché on top - which was easy to poke holes in.


Time to paint! I combined Sakura Crystal Lacquer and Shimmer Smoky Quartz Pearl Terri Sproul Mixers to paint a base layer on the stem and mushroom cap. This is a lovely taupe with hint of a smokey purple and is perfect to paint my Magic Shroom.


Then I began to layer the colors to add depth. I mixed up some Garnet Pearl (orange) and Rose Pearl (pink) Mixers with Crystal Lacquer. This dries suprisingly quick. I brushed on the colors in a dry brush fashion which gives the illusion of the veins under the mushroom cap. 


Don't forget - you CAN mix the colors together! I wanted a brighter green than the Green Pearl Mixer, so I mixed the Pearl Citrine with the Shimmer Aquamarine Mixer. I used this color to paint the top of my mushroom cap and then I accented the edges with Purple Pearl Mixer. The colors are so vibrant, and when layered, can be painted on opaque or in thin layers to show translucency.


**A TIP** You can paint your embellishments to match. I painted some silver brads of various sizes in the colors that I used for some super "blingy" dimensional spots for my mushroom.

Completed "Magical Mushroom" Ornament


This project was so fun to make. I just love the reflective qualities of the micas in the mixers. This looks like a giant foil-wrapped chocolate....sweet enough to eat.

I hope you enjoyed today's post. Go get out your Sakura Crystal Lacquer and Terri Sproul Mixers and play! Please take a look around through the projects from the other Sakura Hobby Craft Design Team members for more great projects, tips and ideas! See you next time on May 16, 2012.

If you have any questions, please leave a comment, select receive e-mail follow ups on comments and I will respond. If you would like to see more of my creations, please visit my blog sbartist : painting in the dark by clicking here.

Have a wonderfully crafty Wednesday : )