There is something about a rustic piece of art that gives it character and for me the more distressed, beat up and rustic the more I love the piece. I really loved how my Crackled Rooster Milk Tin using Sakura's 3D Crystal Lacquer turned out. It truly gave the milk tin a unique look that goes very well with the rest of my rustic yet country charm decor of my kitchen.
It was very fun and easy to create this project, but before I give you instructions on how to create this piece I would like for you to see my finished piece.
This is the front view of my Crackled Rooster Milk Tin and you can even see how the 3D Crystal Lacquer gave it a gorgeous lacquer look!
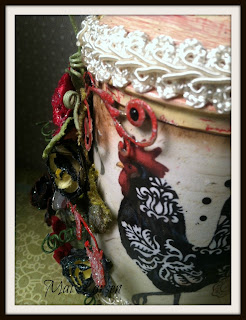
Here is the side view of the tin and the flowers even got a touch of Crystal Lacquer.
If you look really closely below I applied Crystal Lacquer to the flowers and leaves, which worked out awesome, because it stiffen my leaves and harden the flowers.
Here is what the top of the tin looked after applying the 3D Crystal Lacquer.
So, you are probably wondering how do you create this Crackled Rooster Milk Tin using Sakura's 3D Crystal Lacquer well here is what you need to do.
First Step:
Like I always suggest, gather all your supplies.
As you can see from the picture you don't really need a whole lot, but you do need a lot of patience. I strongly recommend that you start with the basics such as:
- Sakura 3D Crystal Lacquer
- Sakura's Milk Tin
- Folk Art -Crackle Medium
- Gesso
- Acrylic Paint (dark color and lighter color)
- Paint Brush
- Glitter
- Digital Image or Decorative Paper
Step Two:
Apply the gesso directly to the milk tin. It works great as a primer and it will allow you to apply the acrylic paint without any difficulty.
Step Three:
Paint a coat of the dark color of Acrylic Paint, I used Apple Barrel Fire Red first and let that dry well. Once that dried I applied the Folk Art Crackle Medium to the entire tin and let that dry as well. You can use a heat gun to speed up this process, but be careful that you don't put the heat gun too close to the crackle, it may cause it to bubble up. Once that dried you can now apply the light color acrylic and you will immediately see the crackling.
Step Four:
If you have a piece of decorative paper apply it to the tin, and I just used Mod Podge and let that dry. I used a 1 3/4" circle punch to punch out the top of my tin. Once dried I immediately started to apply the 3D Crystal Lacquer to my tin. This step gave my tin a glossy look and it was better than applying Mod Podge because you can't see the brush strokes like you would with Mod Podge. I let that fully dry before working with my trim and flowers.
Step Five:
Using a glue gun apply the trim to the top and bottom of the tin. This is optional you don't have to do this step but I love trim and it gave it a unique charm.
Step Six:
Brush some of the 3D Crystal Lacquer to the petals of the flowers and leaves, and dip into glitter. I did this step individually,because the lacquer does dry fairly quickly. While I let the flowers and leaves harden, I took some metal embellishments and painted them really quickly and applied the lacquer. I carefully placed the flowers and metal embellishment onto the tin.
Not very hard to create in fact it was pretty easy and I loved how it turned out.
Sakura's 3D Crystal Lacquer has many uses and I'm having a blast using this product. Not only can I use it to give my projects a 3D effect but I can stiffen my flowers, give a glossy finish to any project, but it can be used as an adhesive.
Be sure to check out Sakura's website at http://www.sakuracraft.com/ and use the COUPON CODE for your purchase to receive 20% off your purchase. COUPON CODE IS SAKURA05
Also May 17th is our Fantasy Blog Hop so be sure to stop by and see what the Design Team has created for you!!!


VERY COOL - THANKS for Sharing Mai!
ReplyDeleteTho, the Blog Hop is May 18th....
this is so pretty, I love the country feel to it, the flowers are gorgeous.
ReplyDeleteVery Pretty Mai , I love it!
ReplyDeleteI love all the jobs everyone did, but my preferred one is the creation from "Creando Con Detalles" one, by Mai Larsen, she put all the perfect embellish to created spectacular milk can, congratulations to all the DT, phenomenal link site, I will recommended 100% to anyone.
ReplyDelete